This post may contain affiliate links. I may earn a small commission if you click and make a purchase, at no extra cost to you.
Fun Shark Fin Cupcakes + Shark Cookies
Shark cupcakes and shark cookies are some of the most playful and exciting desserts you can make for a birthday party or summertime celebration. There’s just something irresistible about bold colors, dramatic fins, and toothy smiles paired with sweet treats. Whether you’re planning a shark-themed birthday party, a poolside bash, or simply surprising your little ocean lover with a fun dessert, these adorable shark sweets bring instant joy to kids and adults alike.

What makes shark desserts so special is how easy they are to customize. You can go silly and cartoonish for younger children, creating friendly-faced sharks with big grins, or design sleek and fierce shark silhouettes for an edgier party vibe. Cupcakes topped with waves of blue frosting and a shark fin instantly command attention, while cookies decorated with shark shapes, ocean patterns, or playful bites make perfect additions to your dessert table.
These treats are also wonderfully versatile. They can serve as the centerpiece of your dessert display, be wrapped individually for party favors, or become a decorating activity for kids to enjoy during the celebration. Because shark themes naturally lean into dramatic shapes and bold colors, even simple decorating techniques look impressive.
Shark-themed desserts also fit beautifully with a variety of party styles — from a cute and colorful preschool birthday to a thrilling “shark attack” pool party. Their visual impact helps build your theme, making your party look cohesive and thoughtfully designed without requiring a large amount of décor.

In this post, we’ll explore creative ways to use shark desserts, exciting ideas for styling a shark party, and fun inspiration for taking your shark cookies to the next level. With thoughtful touches and themed treats, you can create an unforgettable underwater celebration that is as eye-catching as it is delicious.
Looking for some fun shark treats for your shark themed party? We have some simple and easy to recreate shark cookies and shark themed cupcakes to share. These treats will help take your party to a deeper level! Ready to dive in?
Do you have a little one who LOVES sharks? A shark party is a great theme for a summer party or for a shark week birthday. Delicious shark cookies and fun cupcakes are definitely a great start for planning any ocean themed party.
Alright…let’s talk desserts…

How to use Shark Desserts
Shark desserts can be used in so many fun and creative ways, making them a standout feature in your celebration. The most popular way to showcase shark cupcakes and cookies is with a dedicated dessert table. Frost cupcakes with ocean-blue swirls, add paper shark fins, or create mini sharks peeking out of frosting waves. Place shark cookies around the display to add texture and personality. These desserts instantly transform your treat table into an underwater centerpiece.
Individually packaged shark cookies make adorable party favors. Wrap them in clear bags, tie them with ribbon, and add a tag that matches your theme. Guests love taking home a themed treat, and it keeps your party feeling cohesive from beginning to end.

For an interactive twist, let kids decorate their own shark-themed cookies or cupcakes. Set up a decorating station with frosting, sprinkles, fins, candy eyes, and edible decorations. This becomes both an activity and a take-home treat.
Shark desserts also work beautifully as gifts for teachers, coaches, or classmates during summer or ocean-themed events. They’re versatile, eye-catching, and irresistibly cute.
Shark themed desserts are simple and a fun way to incorporate your theme throughout the party. You can plan your decorations around fun themed shark cupcakes and shark cookies as they can truly be the centerpiece of the party.
Be sure to check out the shark party containing these fun treats. Also, here is a tutorial for making the Ombre Layer Cake.
Ideas for a Shark party
A shark party is all about bold visuals, ocean energy, and playful details. Start with a color palette inspired by the sea — deep blues, aqua, grey, white, and pops of red. These colors instantly evoke underwater drama and give you a strong foundation for your décor, desserts, and activities.
Create a fun focal point by designing a shark-themed dessert table. Use wave backdrops, balloon garlands, and shark silhouettes to make it stand out. Add layers of blue fabric or textured paper to mimic the motion of the ocean. Incorporate fins, bubbles, and ocean creatures to complete the look.
Carry the theme into the rest of the party with shark signage, “danger zone” markers, beach-style props, and ocean textures. For a pool party, float inflatable sharks, add themed towels, or create a diving game where kids search for underwater treasures.
Shark-themed food, like blue punch, watermelon shark bowls, or bite-sized snacks labeled with funny names, adds personality and charm. With the right balance of décor, food, and fun, your shark party becomes an unforgettable underwater adventure.
There are tons of ideas for throwing a shark party. From delicious treats to adorable decor, here are some fin-tastic shark party ideas to check out to help you with your party planning.
Don’t forget to come back and make these fun cookies!
Shark Cupcakes Tutorial: STEP by STEP
Ready to bake some shark fin cupcakes? These shark cupcakes are fairly simple. You can start with a cupcake base of literally ANY flavor you want. I made super moist chocolate cupcakes. You can also grab some cupcakes from your local bakery if you want to save time.

What you need:
- Cupcakes (Try this recipe)
- Brown Sugar
- White Frosting
- Gel Food Coloring
- Fondant
- Knife
- Frosting Bag and Tip
Step 1:
Prep your cupcakes. Whether you bake them or buy them, you want them to be cooled completely before you start decorating.
Step 2:
Color your fondant using the gel food coloring. just a little black food coloring is sufficient to make the white fondant gray for the fins.
Mix the food coloring into the fondant.
Step 3:
Roll out your fondant until it is about 1/4 inch thick. Using a knife cut out shark fin shapes from the fondant.
The easiest way to do this is to make a triangle, then cut a small triangle out of one of the sides.
Finally, use your fingers to round out all the sharp edges.
Allow the fondant to completely harden.
Step 4:
Place a very thin layer of frosting onto the cupcakes with a knife. Roll the cupcake tops into the brown sugar. You can also put additional brown sugar on top of the cupcakes.
Step 5:
Mix blue food coloring with the white frosting to the desired color. Using the frosting tips and bags, add blue frosting on top of the brown sugar.
Place the fondant shark fin on top of the blue frosting.
For extra color and fun, place the cupcakes in cute ombre cupcake liners!
Shark Fin Cupcakes

Ready to bake some shark fin cupcakes? These cupcakes are fairly simple. You can start with a cupcake base of literally ANY flavor you want. I made super moist chocolate cupcakes. You can also grab some cupcakes from your local bakery if you want to save time.
Ingredients
- Cupcakes (Try this recipe)
- Brown Sugar
- White Frosting
- Gel Food Coloring
- Fondant
- Knife
- Frosting Bag and Tip
Instructions
Step 1:
Prep your cupcakes. Whether you bake them or buy them, you want them to be cooled completely before you start decorating.
Step 2:
Color your fondant using the gel food coloring. just a little black food coloring is sufficient to make the white fondant gray for the fins.
Mix the food coloring into the fondant.
Step 3:
Roll out your fondant until it is about 1/4 inch thick. Using a knife cut out shark fin shapes from the fondant.
The easiest way to do this is to make a triangle, then cut a small triangle out of one of the sides.
Finally, use your fingers to round out all the sharp edges.
Allow the fondant to completely harden.
Step 4:
Place a very thin layer of frosting onto the cupcakes with a knife. Roll the cupcake tops into the brown sugar. You can also put additional brown sugar on top of the cupcakes.
Step 5:
Mix blue food coloring with the white frosting to the desired color. Using the frosting tips and bags, add blue frosting on top of the brown sugar.
Place the fondant shark fin on top of the blue frosting.
For extra color and fun, place the cupcakes in cute ombre cupcake liners!
Shark Cookies Tutorial: STEP by STEP
Making delicious royal iced sugar cookies is a great way to bake a fun and creative treat. These cute little shark cookies are especially fun because they match the adorable tableware from Target.
I have included three different designs in this tutorial to complement your party!
All three designs are made using my basic cut-out sugar cookie recipe and royal icing.
Ingredients:
- Gel Food Coloring
- Edible Marker
- Sugar Cookie Dough (here is my recipe)
- Royal icing. You can buy that mix or here is a great royal icing recipe to use!! If you are new to cookie decorating, you also need a piping bag, icing tip 1/2, coupler, and clip. I recommend this piping tip set. It’s reasonably priced and includes everything you need.
- Parchment Paper
- Shark Cookie Cutter
- Number Cookie Cutter
- Plaque Cookie Cutter (optional)
- Small Flower Cookie Cutter (optional)
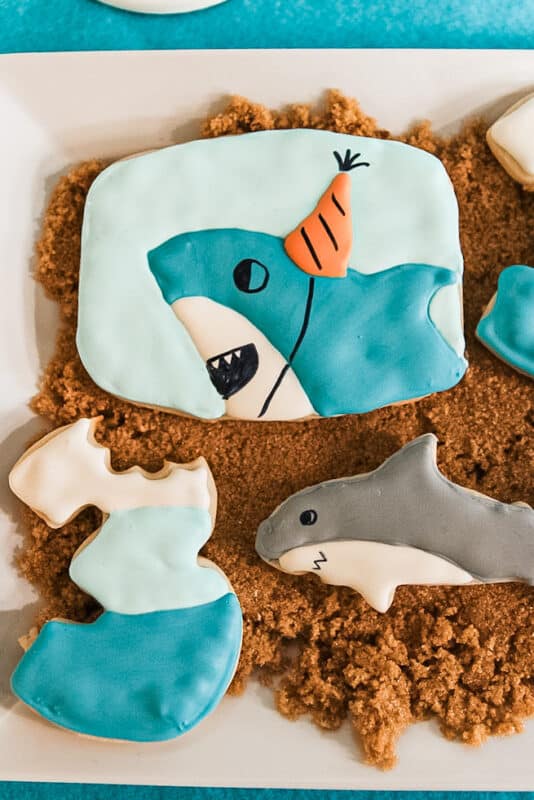
Sharks
The first design is the shark shape cookie. This cute little cookie is super versatile and a favorite of the kids.
Step 1:
Pick your favorite sugar cookie recipe and prep the dough. I like to add a little extra flour to my dough right before I start cutting the cookies so they do not stick to the cutting surface. I also like to liberally flour the surface I am cutting cookies onto.
Once your dough is ready to start cutting, roll it out to about ¼ inch thick. Don’t be afraid of making thick cookies. I feel like the thicker cookies always bake better and decorate so much easier!
Preheat oven according to the recipe. Line cookie sheets with parchment paper. Cut the dough using a shark shaped cookie cutter. Bake the cookies according to the desired recipe.
Allow to cool completely before decorating. I usually like to bake them the day before I decorate.
Step 2:
Using an edible marker, outline the belly of the shark. This will help you to draw the icing in the right spot.
Prepare royal icing. You will need mostly gray, with a smaller amount of white. You can add the gel food coloring to the icing until you have the desired color.
Add small amounts of water to each container and mix until you get the frosting to the desired consistency. You will want the icing to be fill consistency (honey-like) icing.
Fill piping bags with royal icing.

Step 3:
Using the gray icing, outline the shark body and trace the top of the belly. Fill the gray portion of the shark and smooth out any air bubbles with a toothpick or fork prong. Allow the gray to begin to dry before adding the white.
Using the white, outline the belly of the shark. Fill the white portion and smooth out air bubbles.
Allow the icing to completely harden.

Step 4:
Add the eyes and teeth with a black edible marker. Easy peasy and done!
Party Sharks
These fun shark cookies are ready to party. With playful party hats, they are cute and playful.

Step 1:
Pick your favorite sugar cookie recipe and prep the dough. I like to add a little extra flour to my dough right before I start cutting the cookies so they do not stick to the cutting surface. I also like to liberally flour the surface I am cutting cookies onto.
Once your dough is ready to start cutting, roll it out to about ¼ inch thick. Don’t be afraid of making thick cookies. I feel like the thicker cookies always bake better and decorate so much easier!
Preheat oven according to the recipe. Line cookie sheets with parchment paper. Cut the dough using a plaque shaped cookie cutter. You can also freehand these with a knife or use a square or circle cutter. Bake the cookies according to the desired recipe.
Allow to cool completely before decorating. I usually like to bake them the day before I decorate.
Step 2:
Using an edible marker, outline the shark and the party hat. This will help you to draw the icing in the right spot.
Prepare royal icing. You will need mostly light blue and teal, with a little white and orange. You can add the gel food coloring to the icing until you have the desired color.
Add small amounts of water to each container and mix until you get the frosting to the desired consistency. You will want the icing to be fill consistency (honey-like) icing.
Fill piping bags with royal icing.

Step 3:
Outline the shark shape with the teal icing. Fill the teal portion of the shark and smooth out any air bubbles with a toothpick or fork prong. Allow the teal to begin to dry before adding the next color.

Outline the shark shape with the teal icing. Fill the teal portion of the shark and smooth out any air bubbles with a toothpick or fork prong. Allow the teal to begin to dry before adding the next color.
Outline the outside of the cookie with the light blue icing. Fill the light blue portion of the cookie and smooth out any air bubbles with a toothpick or fork prong. Allow the light blue to begin to dry before adding the next color.
Outline the white belly shape shape with the white icing. Fill the white portion of the shark and smooth out any air bubbles with a toothpick or fork prong. Finally, fill the nat section with orange and smooth.
Allow the icing to completely dry.
Step 4:
Using an edible marker, draw the mouth, eyes, and hat lines. These little sharks are ready to party!
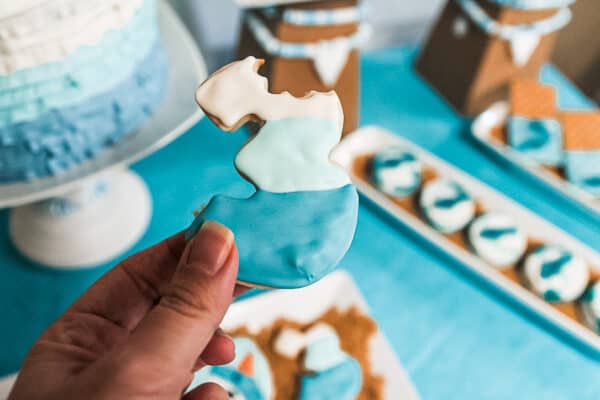
Numbers
Celebrate your little one’s age with some cute ombre number cookies!! Of course, these cookies have a little bite too!
Step 1:
Pick your favorite sugar cookie recipe and prep the dough. I like to add a little extra flour to my dough right before I start cutting the cookies so they do not stick to the cutting surface. I also like to liberally flour the surface I am cutting cookies onto.
Once your dough is ready to start cutting, roll it out to about ¼ inch thick. Don’t be afraid of making thick cookies. I feel like the thicker cookies always bake better and decorate so much easier!
Preheat oven according to the recipe. Line cookie sheets with parchment paper. Cut the dough using a number shaped cookie cutter. To make the shark bite shape, either use a small flower cookie cutter or the edge of a spoon (making little cuts). Bake the cookies according to the desired recipe.
Allow to cool completely before decorating. I usually like to bake them the day before I decorate.
Step 2:
Using an edible marker, mark the spot on the cookies where you want to change icing.
Prepare royal icing. You will need light blue, teal and white. You can add the gel food coloring to the icing until you have the desired color.
Add small amounts of water to each container and mix until you get the frosting to the desired consistency. You will want the icing to be fill consistency (honey-like) icing.
Fill piping bags with royal icing.
Step 3:
Outline the bottom section of the cookie with the teal icing. Fill the teal portion of the cookie and smooth out any air bubbles with a toothpick or fork prong. Allow the teal to begin to dry before adding the next color.
Outline the middle section of the cookie with the light blue icing. Fill the light blue portion of the cookie and smooth out any air bubbles with a toothpick or fork prong. Allow the light blue to begin to dry before adding the next color.
Outline the top section of the cookie with the white icing. Fill the light blue portion of the cookie and smooth out any air bubbles with a toothpick or fork prong.
Allow the frosting to harden. They are ready to eat!
Shark Cookies

Making delicious royal iced sugar cookies is a great way to bake a fun and creative treat. These cute little shark cookies are especially fun because they match the adorable tableware from Target.
I have included three different designs in this tutorial to complement your party!
All three designs are made using my basic cut-out sugar cookie recipe and royal icing.
Ingredients
- Gel Food Coloring
- Edible Marker
- Sugar Cookie Dough (here is my recipe)
- Royal icing. You can buy that mix or here is a great royal icing recipe to use!! If you are new to cookie decorating, you also need a piping bag, icing tip 1/2, coupler, and clip. I recommend this piping tip set. It’s reasonably priced and includes everything you need.
- Parchment Paper
- Shark Cookie Cutter
- Number Cookie Cutter
- Plaque Cookie Cutter (optional)
- Small Flower Cookie Cutter (optional)
Instructions
Sharks
The first design is the shark shape cookie. This cute little cookie is super versatile and a favorite of the kids.
Step 1:
Pick your favorite sugar cookie recipe and prep the dough. I like to add a little extra flour to my dough right before I start cutting the cookies so they do not stick to the cutting surface. I also like to liberally flour the surface I am cutting cookies onto.
Once your dough is ready to start cutting, roll it out to about ¼ inch thick. Don’t be afraid of making thick cookies. I feel like the thicker cookies always bake better and decorate so much easier!
Preheat oven according to the recipe. Line cookie sheets with parchment paper. Cut the dough using a shark shaped cookie cutter. Bake the cookies according to the desired recipe.
Allow to cool completely before decorating. I usually like to bake them the day before I decorate.
Step 2:
Using an edible marker, outline the belly of the shark. This will help you to draw the icing in the right spot.
Prepare royal icing. You will need mostly gray, with a smaller amount of white. You can add the gel food coloring to the icing until you have the desired color.
Add small amounts of water to each container and mix until you get the frosting to the desired consistency. You will want the icing to be fill consistency (honey-like) icing.
Fill piping bags with royal icing.
Step 3:
Using the gray icing, outline the shark body and trace the top of the belly. Fill the gray portion of the shark and smooth out any air bubbles with a toothpick or fork prong. Allow the gray to begin to dry before adding the white.
Using the white, outline the belly of the shark. Fill the white portion and smooth out air bubbles.
Allow the icing to completely harden.
Step 4:
Add the eyes and teeth with a black edible marker. Easy peasy and done!
Party Sharks
These fun shark cookies are ready to party. With playful party hats, they are cute and playful.
Step 1:
Pick your favorite sugar cookie recipe and prep the dough. I like to add a little extra flour to my dough right before I start cutting the cookies so they do not stick to the cutting surface. I also like to liberally flour the surface I am cutting cookies onto.
Once your dough is ready to start cutting, roll it out to about ¼ inch thick. Don’t be afraid of making thick cookies. I feel like the thicker cookies always bake better and decorate so much easier!
Preheat oven according to the recipe. Line cookie sheets with parchment paper. Cut the dough using a plaque shaped cookie cutter. You can also freehand these with a knife or use a square or circle cutter. Bake the cookies according to the desired recipe.
Allow to cool completely before decorating. I usually like to bake them the day before I decorate.
Step 2:
Using an edible marker, outline the shark and the party hat. This will help you to draw the icing in the right spot.
Prepare royal icing. You will need mostly light blue and teal, with a little white and orange. You can add the gel food coloring to the icing until you have the desired color.
Add small amounts of water to each container and mix until you get the frosting to the desired consistency. You will want the icing to be fill consistency (honey-like) icing.
Fill piping bags with royal icing.
Step 3:
Outline the shark shape with the teal icing. Fill the teal portion of the shark and smooth out any air bubbles with a toothpick or fork prong. Allow the teal to begin to dry before adding the next color.
Outline the shark shape with the teal icing. Fill the teal portion of the shark and smooth out any air bubbles with a toothpick or fork prong. Allow the teal to begin to dry before adding the next color.
Outline the outside of the cookie with the light blue icing. Fill the light blue portion of the cookie and smooth out any air bubbles with a toothpick or fork prong. Allow the light blue to begin to dry before adding the next color.
Outline the white belly shape shape with the white icing. Fill the white portion of the shark and smooth out any air bubbles with a toothpick or fork prong. Finally, fill the nat section with orange and smooth.
Allow the icing to completely dry.
Step 4:
Using an edible marker, draw the mouth, eyes, and hat lines. These little sharks are ready to party!
Numbers
Celebrate your little one's age with some cute ombre number cookies!! Of course, these cookies have a little bite too!
Step 1:
Pick your favorite sugar cookie recipe and prep the dough. I like to add a little extra flour to my dough right before I start cutting the cookies so they do not stick to the cutting surface. I also like to liberally flour the surface I am cutting cookies onto.
Once your dough is ready to start cutting, roll it out to about ¼ inch thick. Don’t be afraid of making thick cookies. I feel like the thicker cookies always bake better and decorate so much easier!
Preheat oven according to the recipe. Line cookie sheets with parchment paper. Cut the dough using a number shaped cookie cutter. To make the shark bite shape, either use a small flower cookie cutter or the edge of a spoon (making little cuts). Bake the cookies according to the desired recipe.
Allow to cool completely before decorating. I usually like to bake them the day before I decorate.
Step 2:
Using an edible marker, mark the spot on the cookies where you want to change icing.
Prepare royal icing. You will need light blue, teal and white. You can add the gel food coloring to the icing until you have the desired color.
Add small amounts of water to each container and mix until you get the frosting to the desired consistency. You will want the icing to be fill consistency (honey-like) icing.
Fill piping bags with royal icing.
Step 3:
Outline the bottom section of the cookie with the teal icing. Fill the teal portion of the cookie and smooth out any air bubbles with a toothpick or fork prong. Allow the teal to begin to dry before adding the next color.
Outline the middle ection of the cookie with the light blue icing. Fill the light blue portion of the cookie and smooth out any air bubbles with a toothpick or fork prong. Allow the light blue to begin to dry before adding the next color.
Outline the top section of the cookie with the white icing. Fill the light blue portion of the cookie and smooth out any air bubbles with a toothpick or fork prong.
Allow the frosting to harden. They are ready to eat!
Looking for more ideas for Shark cookies
Shark cookies open the door to endless creative possibilities. You can keep things simple with classic shark silhouettes or get creative with shark heads, fins, life preservers, waves, seashells, or “bitten” cookie designs. For younger kids, smiling cartoon-style sharks are a hit. For older kids, dramatic cookie designs with bold colors and detailed piping can make a big impact.
Try creating a cookie platter arranged like an ocean scene — with different shapes, colors, and textures coming together to tell a story. You can also create matching cookie sets for party favors or thank-you gifts.
Experiment with color, too. Shades of blue, grey, and white look classic and oceanic, while pops of red add a playful “shark attack” vibe. Mix and match glossy flooding, textured waves, edible glitter, and simple line work to add dimension.
Shark cookies are a wonderful way to personalize your celebration, tie your theme together, and add a memorable touch that guests will rave about long after the party ends.
Throwing a shark party is honestly so much fun. For more shark party ideas or ways to incorporate these treats, check out this Fin-tastic Shark Party!
Shop this Party
The easiest way serve all the glorious party treats you make and buy is with some themed party ware. This is budget friendly and keeps the design flowing through every part of your party. Definitely a must buy!!!
When hosting a shark-themed celebration, themed party ware becomes one of the fastest and most effective ways to make your treats look truly impressive. Plates, napkins, cups, and serving trays that match your shark colors or patterns instantly elevate cupcakes, cookies, and snacks. Even the simplest dessert looks like part of a professionally styled display when served on coordinated party ware.
Beyond the visual benefits, themed party ware keeps your tablescape cohesive. When everything echoes the same color palette, your dessert table appears polished without needing elaborate props or expensive décor. Coordinated tableware helps set the mood, enhances your theme, and creates an inviting atmosphere for guests of all ages.
Party ware is also incredibly practical. It simplifies prep, reduces cleanup time, and allows you to focus more energy on the fun parts of party planning. Because it’s budget-friendly and high-impact, themed party ware is one of the easiest investments you can make to bring personality and design consistency into your shark celebration.
With the right party ware supporting your shark desserts, your entire event feels thoughtfully styled, cohesive, and ready for photo-worthy moments.
Looking for the party supplies used in this shark birthday?

Here are some helpful links for styling this party for yourself:
Shark Party Supplies from Meri Meri

Shark Tableware from Home Hoopla

Shark Party Supplies from Oriental Trading

Shark Tableware from Designs by Uniquely You

Conclusion for Shark Cookies and Shark Cupcakes:
Shark-themed desserts bring a unique blend of excitement, creativity, and charm to any celebration. Whether you’re preparing shark cupcakes, decorating shark cookies, or using both as part of a larger dessert table, these treats help define your theme and delight your guests. They instantly introduce energy and personality into your event and make your celebration feel imaginative and thoughtfully styled.
Shark cupcakes offer big visual impact with very little effort. A simple swirl of ocean-colored frosting topped with a fin or cute shark topper becomes a show-stopping dessert. Their height and color create a dynamic focal point, making them perfect for dessert tables, photo ops, or party favors.

Shark cookies, on the other hand, provide room for artistic expression. Whether detailed or simple, these decorated sweets carry personality and create opportunities for creative shaping, coloring, and presentation. They can match the party’s aesthetic precisely — friendly and adorable, sleek and dramatic, or bright and whimsical.
Desserts also help anchor your party theme throughout the space. The colors, shapes, and playful details tie into the larger décor. When paired with coordinated decorations like wave backdrops, bubble accents, and ocean-themed props, your shark party becomes a complete environment rather than just a collection of themed items.

Activities add to the fun. Offering cupcake or cookie decorating gives kids a hands-on experience and doubles as a take-home treat. Simple shark-themed games bring laughter and excitement, allowing your theme to shine beyond the food and décor.
Themed party ware quietly but powerfully supports everything you’ve created. Matching plates, napkins, and cups give your tablescape cohesion and help your desserts shine. Together, these elements create a polished, joyful, and memorable celebration.
Most importantly, shark-themed parties are filled with joy and imagination. Whether your child loves friendly sharks, thrilling ocean adventures, or simply the bold visuals of the theme, your thoughtful planning will create a celebration that feels personal, exciting, and unforgettable. These desserts — combined with creative décor, themed games, and cohesive styling — help transform your event into a one-of-a-kind underwater adventure that your child will remember fondly.
Simple shark themed cookies and cupcakes are great ways for celebrating a birthday with a shark theme. You will love these treats and enjoy making them for your party!
If you love these desserts, please pin this image to your birthday Pinterest board:

Related posts for Shark Party Cupcakes and Cookies:
- Shark Birthday Party Ideas
- Easy Fondant Shark Mouth Cookies
- Adorable + Fun Baby Shark Party Ideas
- How to Bake an Ombre Cake
- Gorgeous Mermaid Birthday Party
- Simple Mermaid Tail Cookies
- Mermaid Party Games and Activities
- How to Plan the Perfect Pool Party
- Trending Party Themes for Summer
- Unforgettable Under the Sea Party Ideas
- Under the Sea Birthday Party
- Vintage Beach Birthday Party
- Shark Party Ideas
- Dolphin Under the Sea Party
- Delightful Narwhal Birthday Party Ideas

My younger son would go crazy for any of these shark desserts! We will have to make some together soon as a great surprise for him.
omg these are the CUTEST!!! That cup cake is something else…I would love to bake me some soon.
They all turned out so cute! I love the shark fin cookies. What a fun idea.
My 4 year old is obsessed with sharks! Really, anything in the ocean. Lol. He would love any and all of these fun treats!
My niece loves sharks so much, she is actually fond of fishes! Last year, I got her a shark soft toy and she was so happy. I am sure she would love these treats 😍
Shark themed desserts are simple and a fun way to incorporate your theme throughout the party. You can plan your decorations around fun themed shark cupcakes and shark cookies as they can truly be the centerpiece of the party.
My niece loves sharks so much, she is actually fond of fishes! Last year, I got her a shark soft toy and she was so happy. I am sure she would love these treats!
My niece loves sharks so much, she is actually fond of fishes! Last year, I got her a shark soft toy and she was so happy. I am sure she would love these treats!
Wonderful place! Not every fun thing should be expensive. Activities like these are way better cause it’s for free or affordable.Cloud Consulting Services
Excellent and good article by the author! This is useful for all type of audience. Thanks for sharing that post.Cloud Consulting Services
I don’t think I’ve read anything like this before. So good to find somebody with some original thoughts on this subject. Thanks for starting this and please keep on sharing with us great information.It is superb blog and i really appreciate your blog.lisa
Great Post !! Very interesting topic will bookmark your site to check if you write more about in the future. Free Mockup
Hi,I would like to recommend you that please keep sharing such type of info.If possible, Thanks แบบการ์ดแต่งงาน