This post may contain affiliate links. I may earn a small commission if you click and make a purchase, at no extra cost to you.
How to make puppy cookies for your party
Puppy-themed treats have a way of instantly making people smile, and puppy cookies are no exception. They’re sweet, playful, and perfect for parties where fun and cuteness take center stage. Whether you’re planning a child’s birthday, a puppy-inspired celebration, or just looking for an adorable dessert idea, puppy cookies bring charm and personality to any dessert table.
What makes puppy cookies so popular is how approachable they are. The design is friendly and recognizable, which makes them especially appealing for kids. They feel whimsical without being complicated, and they work beautifully for a wide range of party styles. From colorful, playful parties to softer, more neutral celebrations, puppy cookies adapt easily while still standing out as a fun focal point.
Puppy cookies are also incredibly versatile. They can be styled to match different color palettes, displayed in creative ways, and served as both desserts and party favors. This flexibility makes them a favorite for hosts who want one treat to serve multiple purposes. When placed thoughtfully on a dessert table, puppy cookies help set the tone for the entire celebration.
This post is designed to help you get the most out of puppy cookies. You’ll find ideas for using them creatively, inspiration for planning a puppy-themed party, and guidance on where to go next if you’re looking for even more puppy cookie inspiration. The goal is to help you feel confident using these adorable treats as part of a cohesive party design.

At their heart, puppy cookies are about joy. They’re playful, lighthearted, and full of personality. When included in a celebration, they add warmth and charm that guests remember. Whether you’re baking them yourself or using them as inspiration, puppy cookies are a sweet way to make any party feel extra special.
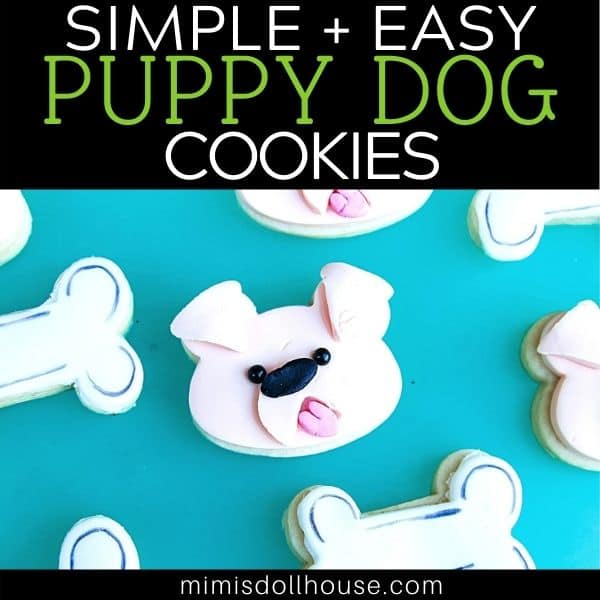
If the thought of adorable puppy sugar cookies makes your tongue wag…you will love these fun and simple puppy dog treats. Follow this simple tutorial to learn how to make adorable puppy cookies for your next birthday.

Ok…puppies are awesome, right? Their cute little wagging tails and their sweet puppy breath. I just want to snuggle all the puppies!
While snuggling all the puppies may not be an option, celebrating your sweet little one who loves puppies definitely is!! We have some super cute puppy cookies you can bake with or for your little one’s big day!
How to use Puppy Cookies
Puppy cookies are incredibly versatile and can be used in many different ways throughout a party. One of the most popular options is to feature them on the main dessert table. When arranged neatly and paired with complementary colors, puppy cookies become a visual focal point that draws guests in.
They also work beautifully as individual treats. Placing one puppy cookie at each place setting adds a personal touch and makes guests feel special. This approach works especially well for kids parties, where individual desserts are easy to serve and manage.
Puppy cookies can also double as party favors. Packaging them thoughtfully allows guests to take a sweet reminder of the celebration home with them. This makes puppy cookies both practical and memorable.

No matter how you use them, presentation is key. Keeping the display clean and intentional helps the cookies stand out without overwhelming the table. When puppy cookies are styled thoughtfully, they elevate the entire dessert spread and reinforce the party theme effortlessly.
Using puppy cookies is super simple. They can be arranged on a plate together or mixed up with some dog bone cookies. You can use a fun colored plate like this teal plate or fill the bottom of the plate with jelly beans or sixlets for some color.
These fun little cookies can also be used to decorate a simple cake. Line the bottom of the cake with puppy faces or press them into the top like a cake topper. So many ideas!
Ideas for a puppy themed party
A puppy-themed party is playful, cheerful, and full of personality. Puppy cookies fit naturally into this theme, helping bring it to life through sweet details and friendly designs. The key to a successful puppy-themed party is consistency. Repeating colors, shapes, and playful elements creates a cohesive look without feeling cluttered.
Decorations for a puppy-themed party should feel lighthearted and welcoming. Simple accents and familiar imagery help the theme feel accessible and fun for kids. When puppy cookies are paired with matching décor, the party feels intentional from start to finish.

Activities and food choices should be easy and kid-friendly. Puppy-themed parties work best when everything is designed to keep kids engaged and happy. Puppy cookies add to that experience by providing a treat that feels fun and familiar.
With thoughtful planning, a puppy-themed party becomes a celebration full of smiles and laughter. Puppy cookies help anchor the theme and create moments guests remember long after the party ends.
If you are looking for more ideas for a puppy party, be sure to check out this Happy Bark Day Puppy Party for tons of decorations and food ideas!
Puppy Cookie Tutorial: STEP by STEP
Ready to learn how to make these fun cookies? Here are the step by step instructions!

Materials:
- Bear shaped cookie cutter. If you want to make them smaller, I used the bear and bone cutter from this set to make mini cookies as well.
- Bone shaped cookie cutter (optional)
- White Fondant (or Peach Fondant, Black Fondant and Pink Fondant)
- Gel Food Coloring (if using White Fondant)
- Fondant Punch
- Black Sugar Pearls
- Sugar Cookie Recipe: I used my no-fail, easy to use Sugar Cookie Recipe.
Step 1:
First…you need to cut and bake the cookies.
For the sugar cookies, you can really use any recipe, as long as it doesn’t spread. I highly recommend my basic cut out sugar recipe. It is great for keeping it’s shape, but most importantly…it tastes delicious.
You will want to use a liberal amount of flour on the surface you are cutting and also add a little extra in the dough itself while you are mixing it.
Roll out dough until it about ¼ inch thick. Using the bear shaped cookie cutter, cut the cookies and place on parchment covered cookie sheets. If you also want to make bone shaped cookies, cut those out as well. Bake according to the recipe.
Allow cookies to completely cool prior to decorating. I like to bake the cookies the day before so they are nice a cool for decorating.
Step 2:
Once your cookies are baked, you can prep your fondant. If you are using white fondant, you can add color to the fondant with the gel food coloring.
To color fondant, start with white and add drops of gel food coloring, mixing as you go until fondant is the desired color. Keep mixing (kneading) until it no longer has a “tie-dyed” look to it. You will need mostly light blue and white fondant with a small amounts of red and black fondant.
If you are using pre-colored fondant, you don’t need to mix any food coloring. Either method works. The only difference is the white fondant option is a little more time consuming, but also more budget friendly.

Step 3:
Start with the tan fondant. Roll it out to 1/8 inch thick. Using the bear shaped cookie cutter, cut out one bear head per cookie. The punch out one small circle per cookie and two triangles.
With the circles, use the tip of the triangle cutter to punch a v shape out of the bottom of the circles. Set the circles aside to begin hardening.
Slightly bend one of the flat edges of the triangles down and set aside to begin drying.
Once the tan pieces have begun to dry, but are still a little tacky, place the circle on the bottom of the bear face with the v facing down and slightly cocked to one side.
Place the triangle shapes onto the ears so that the bend side is pressed into the flat face and the ears “flop” forward.
Press two black sugar pearls into the face above the circle so they will dry into the fondant.
Step 4:
Using the black fondant, punch out one small oval shape per cookie. Set aside to dry.
Using the pink fondant, punch one small heart shape per cookie. Pinch the top of the heart together soit makes a tongue. Set aside to dry.

Step 5:
Once the black oval and pink heart are mostly hard and slightly tacky, place the oval on the top of the circle for a nose. You can presh nostril indentions into the nose with a toothpick or fork prong. Place the pink heart “tongue” into the v shape cut out.
If you need help securing the fondant pieces, you can use a drop of water or a small bit of icing as glue.
The fondant faces can be placed on the cookies with a little icing or a thin layer of frosting.
Step 6:
If you are making the bone cookies, you just need to cut the bone shape from white fondant and allow to dry. You can draw optional lines around the edge of the bone with an edible marker if you choose.
Looking for more ideas for Puppy Cookies?
If you love puppy cookies and want to explore even more ways to use them, there’s plenty of inspiration to build on. Puppy cookies work across a wide range of party styles, which makes them a great starting point for creative planning.
You can experiment with different color palettes, serving styles, and display ideas to keep the look fresh. Puppy cookies also pair well with other themed treats, allowing you to create a dessert table that feels full and balanced.

When searching for more puppy cookie inspiration, think about how you want the party to feel. Playful, sweet, or simple designs can all work beautifully depending on the occasion. Puppy cookies are flexible enough to match your vision.
Exploring new ideas helps keep your parties creative and exciting. With puppy cookies as your foundation, you can continue building themed celebrations that feel fun, cohesive, and memorable.
If you are looking for more ideas for a puppy party…check out these awesome party ware options!
Puppy Themed Party Supplies
If you are looking to plan a puppy themed party, starting with the right supplies can definitely help you get your party moving in the right direction.
The easiest way to serve all the glorious party treats you make or buy is with themed party ware that supports your overall celebration. Coordinated plates, cups, napkins, and serving pieces instantly help the dessert table feel intentional and visually appealing. When puppy cookies are paired with matching party ware, the entire setup feels cohesive and thoughtfully styled.
Themed party ware is also one of the most budget-friendly ways to elevate a party. Instead of adding extra decorations, party ware carries the design across the table naturally. This helps the look flow from one element to the next without additional effort or expense.
Another major benefit is convenience. Party ware simplifies setup and cleanup, which makes hosting easier and more enjoyable. This is especially helpful for kids parties, where minimizing stress allows you to focus on enjoying the celebration.
Most importantly, themed party ware enhances the guest experience. When everything works together visually, guests notice the care that went into planning. Puppy cookies displayed on coordinated party ware look polished and festive, turning simple treats into a standout feature of the party. It’s a simple must-have that delivers big impact.
Puppy Tableware from Meri Meri

Puppy Tableware from Daydream Society

Puppy Tableware from Oriental Trading

Puppy Tableware from Best Party

Puppy Tableware from Stesha Party

Puppy Party Printables
If you want to throw a fun puppy themed party, you can also grab these printable puppy party decorations from my shop:
Conclusion for Puppy Sugar Cookies:
Puppy parties are fun and a great theme for a birthday. These super easy puppy sugar cookies will definitely be a hit for your puppy party. Give this simple tutorial a shot!
Puppy cookies are one of those party treats that instantly bring joy. Their playful design and friendly appeal make them a natural fit for kids parties and puppy-themed celebrations. When used thoughtfully, they do more than satisfy a sweet tooth — they help shape the entire look and feel of the party.

One of the biggest advantages of puppy cookies is their versatility. They can be displayed as a centerpiece, served individually, or packaged as favors. This flexibility makes planning easier and allows you to get more value out of one dessert choice. With the right presentation, puppy cookies feel intentional and special rather than just another treat.
Consistency plays an important role in making puppy cookies shine. When they’re paired with coordinated colors and themed party ware, the entire dessert table feels cohesive. Guests notice these details, and they help elevate the celebration without adding complexity.

From a hosting perspective, puppy cookies are practical. They’re easy to serve, easy to portion, and loved by kids. That reliability makes them a great choice when planning a party that needs to run smoothly.
Most importantly, puppy cookies create moments of happiness. Kids light up when they see them, and parents appreciate the thoughtful design. These small moments add up to a celebration that feels warm, joyful, and memorable.
Whether you’re planning a full puppy-themed party or simply looking for a fun dessert idea, puppy cookies are a charming option. With creative presentation and cohesive styling, they help turn any gathering into a sweet celebration guests will remember long after the last cookie is gone.
If you love these cookies, please pin this image to your birthday Pinterest board:

Related posts for DIY Puppy Cookies:
- Happy Bark-Day Party Ideas
- Adorable Bluey Cakes, Cookies + Desserts
- 16 Wack-a-doo Bluey Party Ideas for Kids
- Easy + DIY Bluey Cookies
- Paw Patrol Party Ideas
- Paw Patrol Cakes and Dessert Ideas
- Puppy Dog Pals Cookies
- Baby Shark Birthday Party Ideas
- Paw Patrol Christmas Ideas
- Ideas for a T.O.T.S. Animal Party
- How to Throw a Cat Themed Birthday Party
- How to Plan a Party Animal Party
