This post may contain affiliate links. I may earn a small commission if you click and make a purchase, at no extra cost to you.
How to make fun Farm Cookies + Farm Cupcakes!
There is something absolutely irresistible about a farm themed party, especially when it comes to dessert. Farm animal cupcakes and cookies bring that perfect mix of sweetness and personality to your celebration, and they always steal the show on the dessert table. Whether you are planning a classic barnyard birthday party, a little farmer first birthday, or a sweet and simple gathering with rustic charm, adorable farm desserts help shape the whole vibe of your event.

One of my favorite things about farm animal treats is how flexible they are. You can go bold and bright with playful pigs, smiling cows, and colorful chickens, or keep things soft and pastel for a baby shower or toddler birthday. Everything from the color palette to the style of the animals can be customized to match your vision. And the best part? They look incredibly impressive without requiring professional pastry skills. Many farm themed desserts are surprisingly beginner friendly, and even the ones that take a little extra effort are worth every minute when you see how cute they turn out.
Kids absolutely love farm animals, which makes these treats an instant hit at any party. There is something magical about giving little ones a dessert table filled with cookies shaped like sheep, cupcakes topped with fondant horses, or treats decorated with tiny ears and big googly eyes. Children rush over to choose their favorite animal, compare treats, and proudly carry their adorable desserts around the party. It is not just food, it is entertainment.
Farm animal cupcakes and cookies also photograph beautifully, which makes your dessert table a highlight in party photos. If you are like me and love capturing memories of your little one’s celebration, barnyard desserts are a goldmine for cute pictures. Their bright colors, fun expressions, and charming details always make your party look even more styled and intentional.

Whether you are baking every treat from scratch, purchasing from a bakery, or mixing homemade goodies with store bought staples, farm themed desserts are guaranteed to elevate your party. They are fun, whimsical, and completely delightful. Let’s dive into all the cutest ideas to help you create a farm dessert table your guests will remember!
Cute farm animal treats are a great way to celebrate a birthday! If you are planning a fun and festive farm birthday, these Farm Animal Cupcakes and Farm Animal Cookies are perfect homemade treats to brighten any dessert table.
Simple and kid-friendly…they will definitely be a hit with your little farmers in training!

Chicks and Ducks and Geese better scurry on over to see these fun treats! If you are planning a farm themed party, there is no need to stress over finding just the right party treats. These cookies and cupcakes are seriously super simple to make!
Making party treats that are delicious and fun for kid’s to eat is kinda my passion. When I thought about styling a fun friendly farm animal party…I KNEW I needed to make some simple and adorable little farm animal treats.
I wanted these treats to be really easy to make and still capture different farm animal. Not just a bunch of piggy cupcakes, but have multiple farm animals. I also wanted them to use fairly simple ingredients!
Ready to try these adorable little animals?

How to use Farm Animal Cookies + Cupcakes
Incorporating these fun little cupcakes and cookies into a party is seriously simple. they can be displayed on simple white plates, because they are already super colorful.
They also would look fantastic sitting in plates lined with fake grass. If you want to bring a little “reality” into your party set-up…make those cute little cupcakes look like they are grazing in a field. Adorable, right?
Ideas for a Farm Party
I recently made these delicious treats for the farm birthday party I styled. They were the perfect compliment to the fun and colorful decorations and really made the party “pop”!
When it comes to planning a farm themed party, dessert is just one part of the magic. There are so many creative, adorable ideas that bring a barnyard celebration to life. A great farm party blends fun textures like rustic wood, gingham patterns, hay bales, paper barn cutouts, and playful farm animal decorations. The beauty of this theme is that it feels warm and homey while still being easy to personalize. You can go full barnyard with tractors, fences, animals, and lots of red and white, or lean into more whimsical touches like pastel farm animals, wooden crates, greenery, and soft neutrals.

Activities help shape the experience too. Little farmers love hands on fun, so consider adding sensory bins filled with corn kernels, “feed the animals” toss games, bubble stations, animal mask crafting, or even a small petting zoo if your venue allows. Simple stations like coloring sheets or sticker tables can keep younger kids entertained, while older ones enjoy scavenger hunts, relay races, or themed obstacle courses.
Food and snacks can also play into your theme. Think “farm fresh” fruit and veggie cups, tractor wheels (Oreos), pig pen pudding cups, or animal shaped sandwiches. And of course, no farm party is complete without adorable farm animal cupcakes and cookies. These sweet treats help anchor the entire theme and create a dessert table guests flock to the moment they walk in.
No matter how big or small your celebration is, farm party ideas make the whole event feel playful, cheerful, and filled with country charm.
Ready to get baking?
Farm Animal Cookies Tutorial: STEP by STEP
First up we have those adorable little farm animal themed sugar cookies. Simple circle shaped sugar cookies transform into clever little animals with some easy to make fondant decorations.

Materials:
- Round Cookie Cutter
- White Fondant
- Gel Food Coloring
- Fondant Punch Kit
- Food Safe Marker
- Black Sugar Pearls
- White Frosting (any kind)
- Plain Sugar Cookies (You can use any recipe, or even store bought round cookies. I used my no-fail, easy to use Sugar Cookie Recipe.)
Step 1:
Prep your sugar cookie dough. I recommend my basic cut out sugar recipe, but you can use whatever recipe you wish, as long as they don’t spread a lot when baking.
Also, feel free to cheat a little and buy round sugar cookies from the store. The cookies will be totally covered with fondant, so as long as you have a round cookie cutter to match the size of your cookie, don’t feel bad about saving some time if you need to!
Liberally, flour the surface and the rolling pin. Roll out dough until it about ¼ inch thick. Using the round cookie cutter, cut the cookies and place on parchment covered cookie sheets. Bake per recipe. Allow cookies to completely cool prior to decorating.
Step 2:
Color fondant. You will use mostly WHITE for these cookies, but also need some additional colors.
For sheep, you will need both white and gray fondant.
For pigs, you will need two shades of pink, mostly a lighter shade, with a smaller amount of darker pink. Also a small amount of black.
For chickens, you will need mostly white with a smaller amount of orange and red.
For cows, you will need white, black and a smaller amount of pink.
To color fondant, start with white and add drops of gel food coloring, kneading as you go until fondant is the desired color.
Step 3:
Make the cookie bases.
Roll White and Light Pink fondant out to 1/4 inch thick. Using the round cookie cutters that match the size of your cookies, cut one large circle per cookie.
You will need a white circle for each chicken, cow and sheep cookie. You will need a light pink circle for each pig cookie.
Lay aside and allow to start drying.
Step 4:
Cut smaller fondant pieces.
Cows: Use the flower shaped punches with black fondant to place on top of the white face (approximately 3 per cookie) . Use the large oval punch to punch one pink nose per cookie.
Punch two very small black ovals for nostrils per cookie and two black hearts for ears per cookie. You will need to trim the black flowers to match the edge of the circle once added.
Pigs: Punch one large oval per cookie for snout from darker pink. Punch two hearts per cookie for ears, also from darker pink. Punch two very small black ovals for nostrils per cookies.
Chicken: Punch three red hearts per cookie from red for top feathers. Punch one orange triangle per cookies for beak. Press two larger white hearts per cookie for wings.
Sheep: Press 8-10 white flowers per cookie for wool. Press one large gray heart for face per cookie and two small gray hearts per cookie for ears.
Set all aside and allow to start drying.

Step 5:
Using a small drop of water per piece as glue (water will help the sugar in the fondant naturally stick as long as you don’t use to much), start attaching pieces as shown in the photo. Add black sugar pearls as eyes.
Draw on cow and pig mouth lines with edible marker. Draw on sheep heart shaped nose and mouth lines also with edible marker.
Step 6:
Once all fondant is hardened, spread a thin layer of frosting on top of the sugar cookies and place the fondant faces on top.
Easy peasy and ready to enjoy!
Easy DIY Farm Animal Cookies
Farm Animal Cookies Tutorial: STEP by STEP
First up we have those adorable little farm animal themed sugar cookies. Simple circle shaped sugar cookies transform into clever little animals with some easy to make fondant decorations.
Ingredients
- Round Cookie Cutter
- White Fondant
- Gel Food Coloring
- Fondant Punch Kit
- Food Safe Marker
- Black Sugar Pearls
- White Frosting (any kind)
- Plain Sugar Cookies (You can use any recipe, or even store bought round cookies. I used my no-fail, easy to use Sugar Cookie Recipe.)
Instructions
Step 1:
Prep your sugar cookie dough. I recommend my basic cut out sugar recipe, but you can use whatever recipe you wish, as long as they don’t spread a lot when baking.
Also, feel free to cheat a little and buy round sugar cookies from the store. The cookies will be totally covered with fondant, so as long as you have a round cookie cutter to match the size of your cookie, don’t feel bad about saving some time if you need to!
Liberally, flour the surface and the rolling pin. Roll out dough until it about ¼ inch thick. Using the round cookie cutter, cut the cookies and place on parchment covered cookie sheets. Bake per recipe. Allow cookies to completely cool prior to decorating.
Step 2:
Color fondant. You will use mostly WHITE for these cookies, but also need some additional colors.
For sheep, you will need both white and gray fondant.
For pigs, you will need two shades of pink, mostly a lighter shade, with a smaller amount of darker pink. Also a small amount of black.
For chickens, you will need mostly white with a smaller amount of orange and red.
For cows, you will need white, black and a smaller amount of pink.
To color fondant, start with white and add drops of gel food coloring, kneading as you go until fondant is the desired color.
Step 3:
Make the cookie bases.
Roll White and Light Pink fondant out to 1/4 inch thick. Using the round cookie cutters that match the size of your cookies, cut one large circle per cookie.
You will need a white circle for each chicken, cow and sheep cookie. You will need a light pink circle for each pig cookie.
Lay aside and allow to start drying.
Step 4:
Cut smaller fondant pieces.
Cows: Use the flower shaped punches with black fondant to place on top of the white face (approximately 3 per cookie) . Use the large oval punch to punch one pink nose per cookie. Punch two very small black ovals for nostrils per cookie and two black hearts for ears per cookie. You will need to trim the black flowers to match the edge of the circle once added.
Pigs: Punch one large oval per cookie for snout from darker pink. Punch two hearts per cookie for ears, also from darker pink. Punch two very small black ovals for nostrils per cookies.
Chicken: Punch three red hearts per cookie from red for top feathers. Punch one orange triangle per cookies for beak. Press two larger white hearts per cookie for wings.
Sheep: Press 8-10 white flowers per cookie for wool. Press one large gray hear for face per cookie and two small gray hearts per cookie for ears.
Set all aside and allow to start drying.
Step 5:
Using a small drop of water per piece as glue (water will help the sugar in the fondant naturally stick as long as you don't use to much), start attaching pieces as shown in the photo. Add black sugar pearls as eyes.
Draw on cow and pig mouth lines with edible marker. Draw on sheep heart shaped nose and mouth lines also with edible marker.
Step 6:
Once all fondant is hardened, spread a thin layer of frosting on top of the sugar cookies and place the fondant faces on top.
Easy peasy and ready to enjoy!
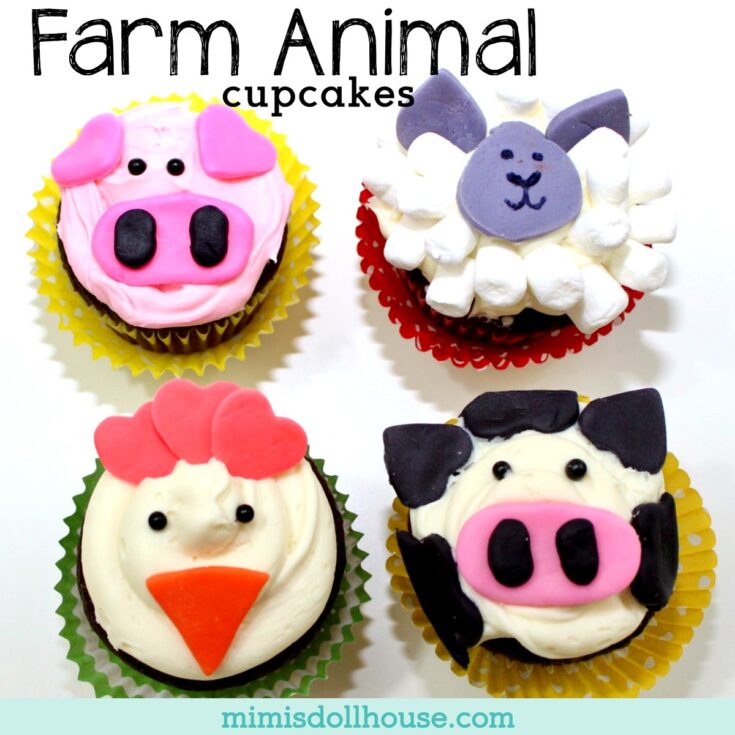
Farm Animal Cupcakes Tutorial: STEP by STEP
Now it’s time to talk super cute cupcakes! For these little cupcakes, I used my easy and moist chocolate cupcakes recipe. You can also check out these amazing cupcake recipes if you want a flavor other than chocolate.

Materials:
- Unfrosted Cupcakes (any flavor. I used this super fluffy chocolate cupcake recipe)
- White Frosting (any flavor)
- White Fondant
- Gel Food Coloring
- Fondant Punch Kit
- Food Safe Marker
- Black Sugar Pearls
- Frosting Bag and Tip
- Small marshmallows
Step 1:
Bake (or cheat and buy) cupcakes in desired flavor. If you opt to buy, I recommend having them frosted in white, since all but the pigs will use white frosting or wiping the frosting off to frost on your own). Allow cupcakes to completely cool before frosting.
Step 2:
Using the frosting tips and bags, frost all cow, sheep and chicken cupcakes with white frosting. Mix a little pink food coloring into your frosting to frost pig cupcakes pink.
Step 3:
Color fondant.
For sheep, you will need gray fondant.
For pigs, you will need pink, darker than the frosting. Also a small amount of black.
For chickens, you will need orange and red.
For cows, you will need black and pink.
To color fondant, start with white and add drops of gel food coloring, kneading as you go until fondant is the desired color.
Step 4:
Cut fondant pieces. First roll out fondant to 1/4 inch thick and cut with punches.
Cows: Use the flower shaped punches with black fondant(approximately 3 per cupcake) . Use the large oval punch to punch one pink nose per cupcake.
Punch two very small black ovals for nostrils per cupcake and two black hearts for ears per cupcake. You will need to trim the black flowers to match the edge of the cupcake before placing in frosting.
Pigs: Punch one large oval per cupcake for snout from pink. Punch two hearts per cupcake for ears, also from pink. Punch two very small black ovals for nostrils per cupcake.
Chicken: Punch three medium red hearts per cupcake from red for top feathers. Punch one large orange triangle per cupcake for beak.
Sheep: Press one large gray oval for face per cupcake and two small gray hearts per cookie for ears. Pinch one end of oval to make the tear drop shape.
Set all aside and allow to start drying.

Step 5:
Once fondant is hardened, draw sheep face onto gray fondant tear drop.
Using a small drop of water per piece, attach nostrils to nose snouts for pig and cow.
Cover sheep cupcakes with small marshmallows (except for the center) for wool.
Step 6:
Place fondant pieces onto frosting as shown in photos. Add black sugar pearls for eyes.
Easy peasy and ready to eat!
Simple Farm Animal Cupcakes
Farm Animal Cupcakes Tutorial: STEP by STEP
Now it's time to talk super cute cupcakes! For these little cupcakes, I used my easy and moist chocolate cupcakes recipe. You can also check out these amazing cupcake recipes if you want a flavor other than chocolate.
Ingredients
- Unfrosted Cupcakes (any flavor. I used this super fluffy chocolate cupcake recipe)
- White Frosting (any flavor)
- White Fondant
- Gel Food Coloring
- Fondant Punch Kit
- Food Safe Marker
- Black Sugar Pearls
- Frosting Bag and Tip
- Small marshmallows
Instructions
Step 1:
Bake (or cheat and buy) cupcakes in desired flavor. If you opt to buy, I recommend having them frosted in white, since all but the pigs will use white frosting or wiping the frosting off to frost on your own). Allow cupcakes to completely cool before frosting.
Step 2:
Using the frosting tips and bags, frost all cow, sheep and chicken cupcakes with white frosting. Mix a little pink food coloring into your frosting to frost pig cupcakes pink.
Step 3:
Color fondant.
For sheep, you will need gray fondant.
For pigs, you will need pink, darker than the frosting. Also a small amount of black.
For chickens, you will need orange and red.
For cows, you will need black and pink.
To color fondant, start with white and add drops of gel food coloring, kneading as you go until fondant is the desired color.
Step 4:
Cut fondant pieces. First roll out fondant to 1/4 inch thick and cut with punches.
Cows: Use the flower shaped punches with black fondant(approximately 3 per cupcake) . Use the large oval punch to punch one pink nose per cupcake.
Punch two very small black ovals for nostrils per cupcake and two black hearts for ears per cupcake. You will need to trim the black flowers to match the edge of the cupcake before placing in frosting.
Pigs: Punch one large oval per cupcake for snout from pink. Punch two hearts per cupcake for ears, also from pink. Punch two very small black ovals for nostrils per cupcake.
Chicken: Punch three medium red hearts per cupcake from red for top feathers. Punch one large orange triangle per cupcake for beak.
Sheep: Press one large gray oval for face per cupcake and two small gray hearts per cookie for ears. Pinch one end of oval to make the tear drop shape.
Set all aside and allow to start drying.
Step 5:
Once fondant is hardened, draw sheep face onto gray fondant tear drop.
Using a small drop of water per piece, attach nostrils to nose snouts for pig and cow.
Cover sheep cupcakes with small marshmallows (except for the center) for wool.
Step 6:
Place fondant pieces onto frosting as shown in photos. Add black sugar pearls for eyes.
Easy peasy and ready to eat!
Coordinating Farm Party Supplies
Setting up a farm party is simple with cute and coordinating party ware and decorations. These treats were specifically made to match this fun party design. Below you can find helpful links for each of the awesome pieces in this set!

Shop This Party
Here are some helpful links for throwing a farm party and grabbing all the goodies we used to create this festive event:

The exact party ideas I used in this party can be purchased here!
Farm Party Supplies from Oriental Trading

Farm Party Supplies from Meri Meri

Conclusion for DIY Farm Animal Cupcakes + Cookies:
Farm themed parties are among the most joyful, heartwarming celebrations you can plan for little ones. The mixture of bright colors, sweet farm animal characters, rustic textures, and playful activities creates an atmosphere that makes kids feel immediately excited and comfortable. Whether your venue is a backyard, a park, or your living room, the farm theme brings the same cheerful charm wherever it goes.
One of the reasons farm parties work so well is because they appeal to a wide age range. Toddlers adore animals and simple sensory activities. Preschoolers love crafts, pretend play, and themed games. Older kids enjoy the creativity baked into farm themed treats and activities. The flexibility of this theme means every child finds something to enjoy, and every parent can adapt it to fit their vision.
Desserts are often the talk of the party, and farm animal cupcakes and cookies give you so many opportunities to wow your guests. From cow print designs to pig snouts made of marshmallows, from fluffy sheep made with mini marshmallows to fondant chickens perched on cupcakes, each treat adds something special to your farm story. These desserts also help guide your color palette and style, making them a natural centerpiece for your theme.
Decorations are just as impactful. You can transform a space instantly with items like red and white barn banners, wooden crates, gingham tablecloths, hay bales, balloons, and farm animal signage. It is easy to sprinkle the theme across food, favors, activities, and photo ops without needing complex DIY skills. Even small touches like farm themed food labels, animal footprints on the floor, or toy tractors on tables help enrich the experience.
Another perk of farm parties is how budget friendly they can be. So many farm elements are easy to source, repurpose, or create at home. Mason jars, baskets, crates, and gingham napkins become décor the moment they hit the table. Using themed partyware ties everything together instantly and saves hours of crafting and setting up.
Most importantly, a farm birthday party is about fun. It is about watching your child’s face light up when they see their favorite animals featured in every part of their celebration. It is about creating memories filled with laughter, creativity, and joy. It is about giving the kids a place to play, imagine, eat adorable treats, and make new memories with their friends.
Your farm party does not need to be Pinterest perfect to be absolutely magical. Whether you go big or keep it simple, your little one will remember the fun, the excitement, and the love that went into their barnyard celebration.
If you love these desserts, please pin this image to your birthday Pinterest board:

Related posts for Farm Cupcakes + Cookies Recipe:
- Colorful + Playful Farm Birthday Party
- Adorable Farm Party
- Woodlands Animals Party Ideas
- Circus Party Ideas
- DIY Sloth Cookies and Cupcakes
- DIY Cat Cookies and Cupcakes
- DIY Panda Cookies and Cupcakes
- How to Throw a Cat Themed Birthday Party
- Cowboy Birthday Party Ideas

My niece loves all animals, so I need to show this to her moms for her next party. This is such a cute idea.
These are just so cute! I am pinning this to use at a future party for my kids!
These are great for a farm-themed party but could also work for springtime in general!
omg these are the cutest ever!!! And the recipes are so easy to follow, thank you so much for sharing…
Wow, these cupcakes look super cute and easy to make! I would love to make it for me!
This idea is the cutest! I love farm animals theme and so do my kids!
Would have been really great if you could include measurements and amounts, especially if you expect this to be used as a tutorial. Smh……