This post may contain affiliate links. I may earn a small commission if you click and make a purchase, at no extra cost to you.
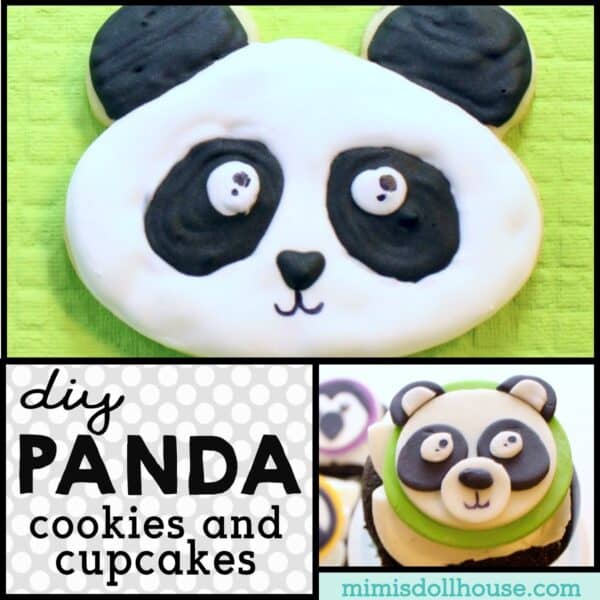
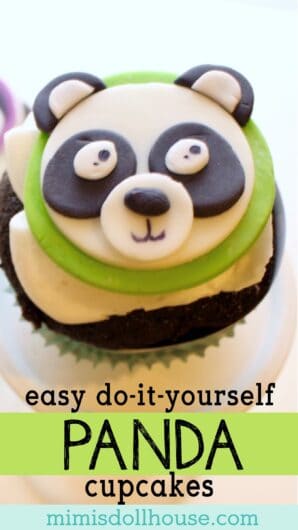
DIY Panda Cookies with Royal Icing and Fondant Panda Cupcakes
Panda themed parties are some of the cutest and most charming celebrations you can plan. Whether you love the sweet black-and-white color palette, the adorable chubby faces, or the simple, modern aesthetic, panda party treats are always a hit. Panda cookies and panda cupcakes are especially popular because they are easy to make, crowd-pleasing, and incredibly photogenic. With just a few simple ingredients and a little creativity, you can create treats that look like they came straight from a professional bakery, even if you are making them at home for the first time.
What makes panda desserts so fun is how approachable they are. You do not need advanced decorating skills or fancy tools. Pandas lend themselves to simple shapes and easy patterns, which means even beginner bakers can jump in with confidence. Oreo ears, chocolate chip eyes, marshmallow cheeks, or hand-drawn expressions turn a basic treat into an adorable panda in minutes. Kids love helping decorate them, and parents love how budget friendly and low stress these recipes can be. Plus, the monochrome color scheme looks beautiful on any dessert table.
Panda themed treats also complement a wide range of party styles. Planning a cute “Party Like a Panda” birthday? Hosting an animal themed playdate? Styling a black-and-white modern dessert table? These panda cookies and cupcakes blend right in. Pair them with printable panda decorations, matching food labels, and themed tableware…your whole setup instantly feels cohesive and camera ready. The panda theme is calm, lovable, and universally appealing, making it perfect for toddlers, preschoolers, and even older kids who appreciate a clean, cute aesthetic.
If you are looking for cute DIY panda desserts that require minimal effort but deliver maximum adorableness, these panda cookie and panda cupcake ideas are going to make your celebration extra special.

It’s Panda Party time! Are you looking for a simple way to make adorable panda themed cookies? How about some delicious and fun Panda fondant cupcake toppers? I’m sharing both ideas today along with all the tips you need to throw a Panda Party!
Pandas are such fun cuddly looking bears. I mean, let’s be real… They are bears so I don’t recommend ACTUALLY cuddling with them, but they LOOK super cuddly! Recently I styled a Zoo themed birthday party for my daughter.
We focused on so fun little animals in that party, including PANDAS! Today, I’m going to show you how to make the easy Fondant Panda Cupcakes and Royal Iced Panda Cookies.
How to use Panda Sugar Cookies in your party set-up
Whether you are choosing a general zoo animal theme or focusing just on adorable panda bears for your party theme. You can use so fun pandas in your desserts as well as your decorations.
One of my favorite party tricks is to pick a simple theme I love and build that theme into every aspect of the party.
This is a great way to ditch the typical character birthdays and just celebrate something your child loves. My daughter loves the zoo…so we grabbed inspiration from some of her favorite animals and built that animal party!
If you love this party theme…you can purchase the coordinating printables at the bottom of this page!
Ideas for a Panda Party
Planning a party themed around Pandas? Whether it’s cultural, you have a little one who is panda obsessed or pandas are just your spirit animal…you can’t wrong with these playful creatures as your party focus.
Before you start baking, take a few minutes and make yourself a party plan. Decide what colors you want to use to accompany your pandas.
Are you going for soft pinks? Do you want bright. Bold colors?
I highly recommend getting some adorable Panda themed party supplies to mix in with some basic colored party supplies.
How to Make Decorated Panda Cookies: STEP by STEP
DIY panda cookies are one of the cutest and easiest treats you can make for a panda themed birthday. With their simple shapes and bold black-and-white details, panda cookies look professionally decorated even when they come together in just a few simple steps. You can use sugar cookies, Oreos, or even store bought round cookies as your base. Add black icing, melted chocolate, chocolate chips, or mini Oreos to create the ears, eyes, and nose, and suddenly you have the sweetest little panda faces. Kids adore helping with the decorating, and the playful expressions make each cookie unique. These are the perfect addition to any panda dessert table because they are easy, fun, and guaranteed to make everyone smile.
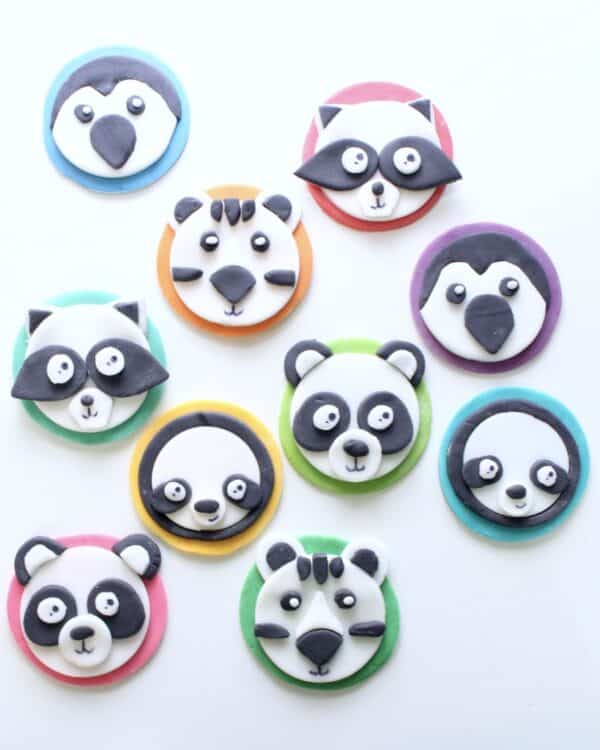
Ok…for the party animal birthday party, we focused on 5 different animals. Since the theme was built around black and white…I chose 5 traditionally black/white animals.
Through this tutorial, I am going to show you step by step how you can make decorated panda sugar cookies.

I also have similar step by step guides for raccoon sugar cookies, white tiger sugar cookies, and sloth sugar cookies. Some of the directions between different animals are the same, however to keep it simple for you, I’ve split the tutorials based on the animal shape!
Panda Cookies
Materials and Ingredients:
- Cookie Cutters (For these cookies, I used the bear head shape from this cookie cutter package. These cutters are INSANELY versatile. I highly recommend them. I have used them to make countless designs and they never let me down!!!)
- Sugar Cookie Recipe and Royal Icing. I used my basic sugar cookie recipe and some royal icing. You can buy that mix or here is a great royal icing recipe to use!! If you are new to cookie decorating, you also need a piping bag, icing tip 1/2, coupler, and clip. I recommend this piping tip set. It’s reasonably priced and includes everything you need.
- Black Gel Food Coloring
Step 1:
Using your sugar cookie recipe, prep the dough. I like to add a little extra flour to my dough right before I start cutting the cookies to help them not stick to the cutting surface. Usually, I just rub a little on my hands and then rub it into the dough.
Once your dough is ready, roll it out to about ¼ inch thick. Don’t be afraid of making thick cookies. I feel like my thicker cookies always bake better and I’m happier with them once they are decorated.
Step 2:
Preheat oven according to preferred recipe. Line cookie sheets with parchment paper. Cut the dough using the bear shaped cookie cutter. Bake the cookies according to the desired recipe.
Typically I pull the cookies out of the oven a little shy of what the recipe calls for. You do not want the edges browning. Browning means you have already baked them too long! Allow to cool.
Once the cookies are completely cool (I recommend waiting a full day to top with icing),
Step 3:
Prepare both white and black royal icing. Once you have prepared your royal icing based on your recipe or from a royal icing mix, Separate it into two halves. One half will stay white the other half will be colored black.
As a warning…you will need a good amount of black food coloring to get a true black from white icing. Once the two containers of icing are colored correctly, you will want to pull out a third of each to set aside for piping icing and mix ⅔ of the icing for fill icing.
Add small amounts of water to each container and mix until you get the frosting to the desired consistency. Piping icing should be toothpaste-like and fill icing should be honey-like.
Put the four icings into 4 separate piping bags. I like to use number 1 or 2 tips for piping icing and number 3 tips for fill.
Step 4:
Using the edible marker, draw the black eye shapes onto your cookies as shown in the photo below
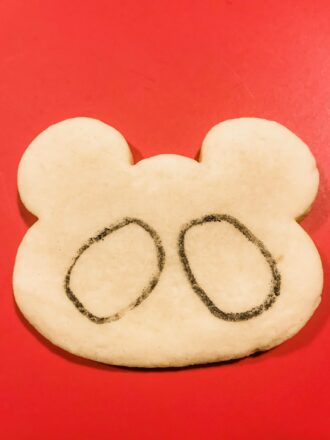
Start with black piping icing and trace over the lines. Using the black fill icing, fill in the black eyes. Before the black icing drys, put a small circle of white fill into the black eyes to make the white part of the eyes. You want to let this settle into the black icing so they are the same level.
Let the icing dry.
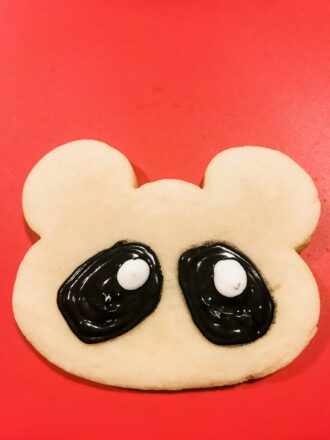
Trace the outside of the face (not ears) with the white piping icing. Fill in the face with white fill icing. Let dry.
Trace the ears with black piping icing and fill with black fill icing. Make a small oval for the nose with black piping icing. Allow the icing to dry.
Once the icing is fully dry, add eye pupils and mouth with black edible marker.
Cookies are done and ready to party!!!

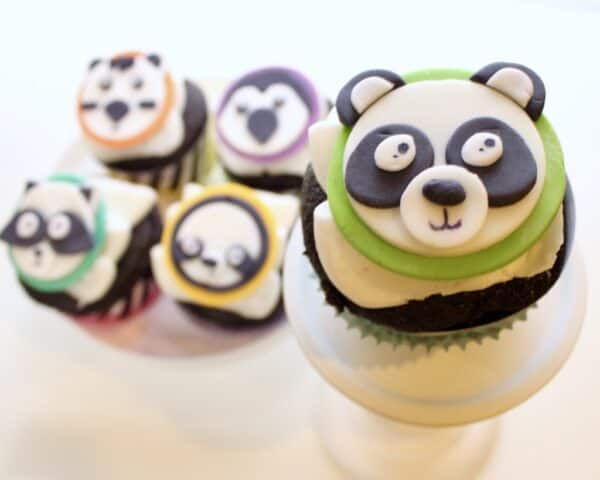
How to Make Fondant Panda Cupcakes: STEP by STEP
DIY panda cupcakes are another crowd favorite and an adorable way to add height and personality to your dessert table. Start with your favorite cupcake recipe—vanilla, chocolate, or even cookies and cream—and top them with white buttercream frosting. Then use chocolate chips, candy melts, mini marshmallows, fondant circles, or mini Oreos to build the panda face. A couple of black ears and some sweet little eyes are all you need to bring each panda to life. You can make them as simple or detailed as you want. Kids absolutely love choosing their favorite panda face, and these cupcakes look amazing displayed on a tiered stand or cute dessert tray. They are simple enough for beginners and impressive enough for center stage at your party.
Like the cookies above..we also focused on 5 different animals for the cupcakes.. Through this tutorial, I am going to show you step by step how you can make decorated panda cupcakes.
I also have similar step by step guides for raccoon cupcakes, white tiger cupcakes, and sloth cupcakes. Some of the directions between different animals are the same, however to keep it simple for you, I’ve split the tutorials based on the animal!
Panda Cupcakes
Materials
- Cupcakes and frosting in desired flavor. You can bake these yourself or save time and get them from a local grocery store or bakery. You can even order a lot of bakery items for instore pickup from Target (#momwin) I’m all for time savers!!!
- Fondant
- Gel Food Coloring
- Small shapes cookie cutters
- Circle Cookie Cutter set
- Edible markers
- Powdered sugar
Step 1:
Bake cupcakes (or buy them…your call!) Prep frosting according to recipe. Prepare fondant. You will want at least one color and black and white fondant ready to use. For the party animal party, I used several different colors, but you can always simplify to just one or two colors.
Step 2:
Roll out colored fondant to about ¼ inch thick. Use powdered sugar to powder the surface and rolling pin to prevent sticking. Cut 2 inch circles from colored fondant (1 per cupcake). Set aside to dry completely.
You want these to dry until they are hard. I typically flip them over after about an hour to make sure that both sides dry and will move them slightly while drying so make sure they aren’t sticking to the drying surface.
Step 3:
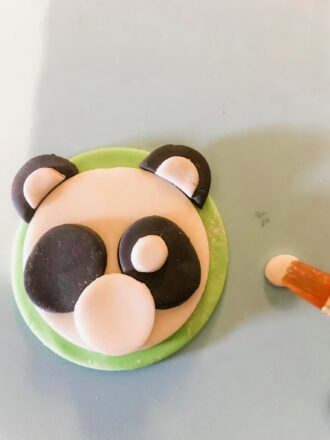
Roll out white and black fondant to about ¼ inch thick. Cut with smaller circle (1 ½-1 ¾ inch). Cut two very small circles (about the size of a pencil eraser for the eyeballs. Set aside to dry.
Cut two ovals using small cookie cutters that fit onto the white circle easily for the black markings around the panda eyes.
Cut two small black circles for ears. Use the circle cutter you used for the white circle to cut the ears in half so they line up with the outside of the white face.
Repeat this process with smaller white circles for the inner ear. Finally, make a small white circle and cut a very small oval from black for the nose. Allow all to dry.
Step 4:
Once the fondant is firm enough to move without changing shape, use water as glue (I use a small paintbrush for this) and attach pieces together to form the face.
First, the large white circle gets put onto the color circle. Then the black ears and white inner ears above the face.
Next, the black eye markings, with the white eyes on top. Lastly, the muzzle and nose.
Allow all fondant to dry. Once dry, use the edible marker to add the mouth and the eye pupils.

Looking for more ideas for Panda Desserts?
Panda desserts extend far beyond cookies and cupcakes. The black-and-white theme is incredibly versatile, making it easy to create a full dessert table without complicated recipes. Think panda marshmallow pops, panda rice krispie treats, panda donut holes, panda brownies, or even layered panda parfaits. You can use chocolate, vanilla, and Oreo inspired ingredients to build a cohesive look that ties everything together. Add themed labels, bamboo accents, and a few printable decorations to complete the look. Panda desserts are naturally photogenic and kid friendly, which makes them perfect for birthday parties, school events, or animal themed celebrations. With simple ingredients and a creative touch, you can build a dessert spread that is both adorable and delicious.
If you are looking for more options for baking (or buying) animal cookies…prepare to be amazed at the cuteness coming your way!!
More Panda Cookies, Cakes and desserts to Bake or Buy:
Slice and Bake Panda Cookies from Food Network

Panda Macarons from B Events Miami

Easy Panda Cupcakes from Bakerella

Panda Cookies from Marta’s Cakes and Cookies

Panda Cake Topper from I Love Honey Bees

Coordinating Animal Party Supplies
The easiest way to serve all the glorious party treats you make and buy is with some themed party ware. This is budget friendly and keeps the design flowing through every part of your party. Definitely a must buy!!! Panda themed tableware is especially adorable because the black-and-white palette is so easy to coordinate. A few key pieces instantly elevate your dessert table and make your panda cookies and cupcakes look even more charming.
Use solid white plates, black dessert trays, and polka dot napkins to create a modern panda vibe. Add bamboo accents or small greenery sprigs for a soft, natural touch. Pair your tableware with panda printable food tents, cupcake toppers, and themed signs to make your whole table feel cohesive and intentional. Even simple store bought cupcakes become party ready with a cute panda topper.
Themed tableware also keeps your setup clean and organized. Matching cups and plates make the whole display feel polished, while disposable pieces keep cleanup quick and stress free. Kids love choosing plates with pandas or polka dots, and parents appreciate how put together the dessert table looks. With coordinated tableware, your panda party instantly feels adorable, styled, and photo ready without adding extra work.
So you’ve seen the options for panda cookies and cupcakes…and you know the other adorable animal goodness. If you want to throw a party animal party too…here are some fun and easy to use Party Animal Printables for you!
We also have step by step printables directions available to help you every step of the way!!
Panda Party Supplies from Oriental Trading

Panda Party Supplies from Amazon
Conclusion for Simple Panda Cookies & Panda Cupcakes Recipes:
Panda themed treats are some of the most adorable and crowd pleasing desserts you can add to a birthday party. Their simple black-and-white palette makes them easy to decorate, incredibly photogenic, and perfect for a wide variety of celebrations. Whether you are hosting a “Party Like a Panda” birthday or planning a cute animal themed event, panda cookies, cupcakes, and desserts bring a playful charm that kids absolutely love.
What makes panda desserts so special is how approachable they are. You do not need advanced baking skills or a long list of fancy tools to create something truly magical. Even beginners can create panda faces that look sweet, expressive, and party ready. The simplicity of the shapes—round faces, dotted eyes, little ears—means you can use anything from candy to chocolate chips to fondant to achieve the look you want. This flexibility makes panda desserts perfect for busy parents, casual bakers, and anyone who wants adorable results without hours of work.
Pairing your treats with themed tableware helps elevate your entire presentation. Black-and-white plates, bamboo accents, polka dot napkins, and panda printable labels tie your table together effortlessly. These small details make your dessert table look cohesive and professionally styled, even if most of your treats are simple DIY creations.
Panda themed desserts also offer wonderful opportunities for kids to participate in the party fun. Decorating cookies or cupcakes can be an activity in itself. Set out a decorating station with candy pieces, chocolate chips, frosting, and sprinkles, and each child can create their own panda masterpiece. It is interactive, entertaining, and delicious. Kids love taking ownership of their creations, and these treats double as adorable party favors.
No matter how elaborate or simple your dessert selection is, panda treats always deliver smiles. They make guests feel delighted, create sweet photo opportunities, and bring personality to your celebration. With easy recipes, flexible decorating options, and a color palette that works with any party setup, panda desserts are truly the perfect addition to your event.
Woo…that was a LOT of Panda! Throwing a Panda party can be a super memorable experience all around without being expensive or stressful. These easy DIY tutorials make partying with a panda a breeze!!
If you like these panda desserts, please pin this image to your birthday Pinterest board:

Related posts for DIY Panda Party Desserts:
- Party Animal Party Ideas
- DIY Sloth Cookies and Cupcakes
- DIY Penguin Cookies and Cupcakes
- DIY Tiger Cookies and Cupcakes
- DIY Raccoon Cookies and Cupcakes
- DIY Cat Cookies and Cupcakes
- Penguin Party Ideas
- Woodlands Animals Party Ideas
- Monkey Party Ideas
- DIY Monkey Headbands
- Circus Party Ideas
Thank you for reading about my decorated panda desserts!

Simple? LOL! I would totally BOTCH THIS CRAP OUTTA THESE COOKIES but I would hope they would at least TASTE GOOD – lol!
These are so cute! I could easily do the one with piping the frosting, but I’ve never worked with fondant before. The others are so cute, too!
These are darling! I almost want to throw a party just so I can make them!
Lol, this is a new one, but i like the idea already. Thank you for sharing.
Stop it. These are so good. So stinking cute. My boys would love them!
This so cute and although I am not having any party, I will make them with my daughter next weekend. Thanks for sharing.
Awwwn look at those panda cookies and cupcake they look so cute and delicious. Great idea love it.
I love these cookies and cupcakes – they are so cute! But then again, I’m a big fan of anything that involves pandas…
I loved this idea 😍 These look so cute and delicious! The process of making them is not simple , but I will try at least once! Super cute photos ☺
OMG, these are super cute! I have to try to make these for work!
These are super cute! My daughter loves pandas and I was thinking of throwing a panda birthday and love these as the treat!
Oh my gosh how cute are these. I love this cookie idea and may even give these a go as I bet they tasted yummy xx