This post may contain affiliate links. I may earn a small commission if you click and make a purchase, at no extra cost to you.
Celebrate your next birthday with Cat Cookies and Cat Cupcakes!
Cat cupcakes and cat cookies are the kind of party treats that instantly make guests smile. With their cute faces, playful details, and endless styling possibilities, these treats are perfect for birthday parties, playdates, classroom celebrations, and themed gatherings. Whether your child loves kittens, cartoons, or all things cozy and cute, cat themed desserts fit beautifully into a wide range of celebrations.

One of the biggest reasons cat cupcakes and cookies are so popular is their versatility. They can be simple and sweet or detailed and decorative depending on the vibe you want to create. Soft pastel colors feel gentle and charming, while bolder shades add a playful pop of energy. No matter the style, cat themed treats always feel intentional and fun.
These desserts also work wonderfully as both food and decor. When styled thoughtfully, cat cupcakes and cookies become part of the visual story of the party. They add color, texture, and personality to dessert tables and displays, helping the entire setup feel cohesive and polished.
Another advantage of cat cupcakes and cookies is how approachable they are. They are easy to serve, easy to portion, and universally loved by kids. This makes them ideal for parties where convenience matters just as much as presentation.

If you are planning a celebration that feels playful, creative, and memorable, cat cupcakes and cookies are a perfect choice. With the right styling and display, they become one of those party details guests remember long after the last treat is gone.
Pretty little kitties and furry friends unite, we have some adorable Cat Cookies and Cat Cupcakes that you can make at home with your kiddos! Delicious and adorable…these little kitty treats will make your next party a hit!

Have you ever noticed that little kids love cats? I mean the internet in general seems to really love cats, but little kids go crazy for those furry little critters! We have a neighborhood cat that LOVES our backyard. Every time she comes into our yard, they get so excited to see her and are always trying to leave her little treats.
It’s that universal love of kitty cats that makes these fun and nerdy little kitty cookies and cupcakes so much fun. Ready to bake up some fun treats?
How to use Cat Cupcakes + Cookies
Cat cupcakes and cookies are incredibly versatile and can be used in several ways throughout a party. One of the most popular options is to feature them as the centerpiece of a dessert table. When arranged neatly with consistent spacing, these treats immediately draw attention and help define the theme.
Another great way to use cat cupcakes and cookies is by mixing them with other desserts. Cupcakes add height and softness to the display, while cookies bring structure and detail. Together, they create visual balance and keep the table interesting without feeling cluttered.

Cat cupcakes also work well as individual servings. They are easy for kids to grab and enjoy without utensils, which keeps the party moving smoothly. Cookies can be packaged individually or stacked for guests to choose from, adding flexibility to the setup.
These treats can also double as party favors. When set aside on a separate table or handed out at the end of the celebration, they feel thoughtful and special. Guests love taking home a treat that matches the party theme.
Using cat cupcakes and cookies strategically throughout the party helps reinforce the theme and ensures that the desserts feel intentional rather than random.
These adorably fun cookies and cupcakes can be used for a cat birthday or as fun sweets to bake with your kids. The design of these treats is a fun and playful, nerdy kitty feel that is just too, too delightful!
Ideas for a Cat Themed party
A cat themed party is all about embracing playful charm and cozy details. The goal is to create an environment that feels fun, welcoming, and full of personality. Repeating cat motifs throughout the space helps tie everything together.
Color choice plays a big role in setting the tone. Soft pastels feel sweet and calming, while brighter colors add excitement and energy. Either approach works beautifully as long as the palette stays consistent.
Decor and food should work together to tell the story of the party. Cat cupcakes and cookies fit naturally into this theme and help anchor the dessert table. When the treats match the decor, the entire space feels cohesive.
Activities and displays can also support the theme. Keeping everything visually connected helps the party feel immersive without being overwhelming.
A well planned cat themed party feels thoughtful and playful at the same time. By carrying the theme through every detail, the celebration becomes more than just a gathering. It becomes an experience.
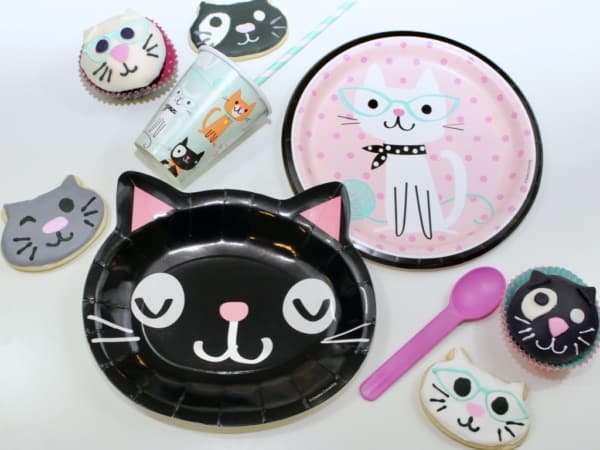
I baked these fun little cat cookies and cat cupcakes for our cat birthday party to match this amazing set of cat themed tableware. Be sure to check out our post on How to Throw a Cat Themed Party!
Ready to start learning how to make these fun little treats?
Cat Cupcake Tutorial: STEP by STEP
First up are the fun little kitty cupcakes. These were super simple to make and oh so delicious. The cupcake base was my easy no fail chocolate cupcake recipe, but you can really make these using any flavor or cupcake recipe you prefer.

Materials:
- Cupcakes (any color or flavor)
- White frosting (any flavor)
- Fondant (I recommend starting with white and coloring to desired color)
- Royal Icing or Icing Pouches
- Gel Food Coloring
Step 1:
Bake cupcakes using recipe of choice and allow to fully cool. If you are in a hurry…you can also buy cupcakes and scrape off the frosting to decorate.
Step 2:
Divide fondant and using the food coloring, make some black, some gray, a smaller amount pink and then leave some white. Roll out fondant to 1/4 inch thick and cut as appropriate.
There are four basic cat designs:
For the two white cat faces, you want a piece approximately 4″x4″ rolled out thinner than 1/4 inch to cover the top of the cupcakes. You will also need two small triangular ears per cupcake.
From the pink fondant, you need one pink nose piece per cupcake. Round the edges of the triangle to make the nose. From the black fondant you need two small round eye circles.
For the gray cat faces, you want a piece approximately 4″x4″ rolled out thinner than 1/4 inch to cover the top of the cupcakes. You will also need two small triangular ears per cupcake.
From the pink fondant, you need one pink nose piece per cupcake. Round the edges of the triangle to make the nose. From the black fondant you need one small round eye circle.
For the black cat faces, you want a piece approximately 4″x4″ rolled out thinner than 1/4 inch to cover the top of the cupcakes. You will also need two small triangular ears per cupcake and one round eye circle.
From the pink fondant, you need one pink nose piece per cupcake. Round the edges of the triangle to make the nose. From the white fondant cut a larger oval piece for the spot behind the eye and one small round eye circle.
Allow all fondant pieces to harden while you move onto step 3.
Step 3:
Put a thin layer of white frosting on the top of the cupcakes. Spread the large fondant pieces over the cupcake top and press the edges to the edges of the cupcake. Trim extra fondant (which can be re rolled to cover additional cupcakes.)
Step 4:
Using small drops of water, place fondant pieces on the cupcakes for the ears, eyes and noses.
Step 5:
If you are comfortable using royal icing, prep your icing. You will need black, white and teal icing. If you are NOT comfortable with royal icing, you can use the icing pouches to do the same thing.
Draw on the mouths, whiskers, freckles, winky eye and glasses with the icing.
Allow all to dry and the cupcakes are ready to serve. Dress up the cupcakes with fun colored cupcake liners.
Purr-fect Cat Cupcakes

First up are the fun little kitty cupcakes. These were super simple to make and oh so delicious. The cupcake base was my easy no fail chocolate cupcake recipe, but you can really make these using any flavor or cupcake recipe you prefer.
Ingredients
- Cupcakes (any color or flavor)
- White frosting (any flavor)
- Fondant (I recommend starting with white and coloring to desired color)
- Royal Icing or Icing Pouches
- Gel Food Coloring
Instructions
Step 1:
Bake cupcakes using recipe of choice and allow to fully cool. If you are in a hurry...you can also buy cupcakes and scrape off the frosting to decorate.
Step 2:
Divide fondant and using the food coloring, make some black, some gray, a smaller amount pink and then leave some white. Roll out fondant to 1/4 inch thick and cut as appropriate.
There are four basic cat designs:
For the two white cat faces, you want a piece approximately 4"x4" rolled out thinner than 1/4 inch to cover the top of the cupcakes. You will also need two small triangular ears per cupcake.
From the pink fondant, you need one pink nose piece per cupcake. Round the edges of the triangle to make the nose. From the black fondant you need two small round eye circles.
For the gray cat faces, you want a piece approximately 4"x4" rolled out thinner than 1/4 inch to cover the top of the cupcakes. You will also need two small triangular ears per cupcake.
From the pink fondant, you need one pink nose piece per cupcake. Round the edges of the triangle to make the nose. From the black fondant you need one small round eye circle.
For the black cat faces, you want a piece approximately 4"x4" rolled out thinner than 1/4 inch to cover the top of the cupcakes. You will also need two small triangular ears per cupcake and one round eye circle.
From the pink fondant, you need one pink nose piece per cupcake. Round the edges of the triangle to make the nose. From the white fondant cut a larger oval piece for the spot behind the eye and one small round eye circle.
Allow all fondant pieces to harden while you move onto step 3.
Step 3:
Put a thin layer of white frosting on the top of the cupcakes. Spread the large fondant pieces over the cupcake top and press the edges to the edges of the cupcake. Trim extra fondant (which can be re rolled to cover additional cupcakes.)
Step 4:
Using small drops of water, place fondant pieces on the cupcakes for the ears, eyes and noses.
Step 5:
If you are comfortable using royal icing, prep your icing. You will need black, white and teal icing. If you are NOT comfortable with royal icing, you can use the icing pouches to do the same thing.
Draw on the mouths, whiskers, freckles, winky eye and glasses with the icing.
Allow all to dry and the cupcakes are ready to serve. Dress up the cupcakes with fun colored cupcake liners.
Cat Cookies Tutorial: STEP by STEP
What’s a cat party without some adorable cat cookies? They fun and playful little kitty sugar cookies are perfect for any kitten loving little one to enjoy. With nerdy and cute expressions, they bring personality to life and will be the talk of the party!

Materials and Ingredients:
- Cat Face Cookie Cutter
- Sugar Cookie Recipe and Royal Icing. I used my basic sugar cookie recipe and some royal icing. You can buy that mix or here is a great royal icing recipe to use!! If you are new to cookie decorating, you also need a piping bag, icing tip 1/2, coupler, and clip. I recommend this piping tip set. It’s reasonably priced and includes everything you need.
- Gel Food Coloring
- Parchment Paper
Step 1:
Pick your favorite sugar cookie recipe and prep dough accordingly. I like to add a little extra flour to my dough right before I start cutting the cookies to help them not stick to the cutting surface. Usually, I just rub a little on my hands and then rub it into the dough. I also liberally flour the surface I am cutting cookies onto.
Once your dough is ready to start cutting, roll it out to about ¼ inch thick. Don’t be afraid of making thick cookies. I feel like my thicker cookies always bake better and decorate easier!
Step 2:
Preheat oven according to the recipe. Line cookie sheets with parchment paper. Cut the dough using a cat face shaped cookie cutter. Bake the cookies according to the desired recipe.
Typically I pull the cookies out of the oven a little earlier than what the recipe calls for. You do not want the edges browning. Browning means you have already baked them too long! Allow cookies to cool.
For best results, bake cookies the day before you decorate them.
Step 3:
Prepare white, black, light gray, pink and teal royal icing.
As a warning…you will need a good amount of black food coloring to get a true black from white icing.
Add small amounts of water to each container and mix until you get the frosting to the desired consistency. You will want the black, white and gray to be both piping and fill consistency.
You will want the pink and teal icing to be piping consistency. Piping icing should be toothpaste-like and fill icing should be honey-like.
Put the icings into separate piping bags. I like to use number 1 or 2 tips for piping icing and number 3 tips for fill.
Step 4:
Outline and fill the white and gray cat faces. While the icing is still wet, add black eyes and pink noses with the icing. The color will spread a bit so go slowly and do not use too much.
Outline and fill the white eye spot on the black cookies, then outline and fill the rest of the black face. While the icing is still wet, add white and black eyes and pink noses with the icing. The color will spread a bit so go slowly and do not use too much.
Allow all icing to dry.
Step 5:
Using the piping icing, draw the eye wink, whiskers, mouths and glasses onto the kitten faces. Allow all to dry.
Simple and ready to serve!
Purr-fect Cat Cookies Recipe

What's a cat party without some adorable cat cookies? They fun and playful little kitty sugar cookies are perfect for any kitten loving little one to enjoy. With nerdy and cute expressions, they bring personality to life and will be the talk of the party!
Ingredients
- Cat Face Cookie Cutter
- Sugar Cookie Recipe
- Royal Icing.
- piping bag
- icing tip 1/2
- Gel Food Coloring
- Parchment Paper
Instructions
Step 1:
Pick your favorite sugar cookie recipe and prep dough accordingly. I like to add a little extra flour to my dough right before I start cutting the cookies to help them not stick to the cutting surface. Usually, I just rub a little on my hands and then rub it into the dough. I also liberally flour the surface I am cutting cookies onto.
Once your dough is ready to start cutting, roll it out to about ¼ inch thick. Don’t be afraid of making thick cookies. I feel like my thicker cookies always bake better and decorate easier!
Step 2:
Preheat oven according to the recipe. Line cookie sheets with parchment paper. Cut the dough using a cat face shaped cookie cutter. Bake the cookies according to the desired recipe.
Typically I pull the cookies out of the oven a little earlier than what the recipe calls for. You do not want the edges browning. Browning means you have already baked them too long! Allow cookies to cool.
For best results, bake cookies the day before you decorate them.
Step 3:
Prepare white, black, light gray, pink and teal royal icing.
As a warning...you will need a good amount of black food coloring to get a true black from white icing.
Add small amounts of water to each container and mix until you get the frosting to the desired consistency. You will want the black, white and gray to be both piping and fill consistency.
You will want the pink and teal icing to be piping consistency. Piping icing should be toothpaste-like and fill icing should be honey-like.
Put the icings into separate piping bags. I like to use number 1 or 2 tips for piping icing and number 3 tips for fill.
Step 4:
Outline and fill the white and gray cat faces. While the icing is still wet, add black eyes and pink noses with the icing. The color will spread a bit so go slowly and do not use too much.
Outline and fill the white eye spot on the black cookies, then outline and fill the rest of the black face. While the icing is still wet, add white and black eyes and pink noses with the icing. The color will spread a bit so go slowly and do not use too much.
Allow all icing to dry.
Step 5:
Using the piping icing, draw the eye wink, whiskers, mouths and glasses onto the kitten faces. Allow all to dry.
Simple and ready to serve!

Looking for more ideas for Cat Cookies + Cupcakes?
If you are looking for more ideas for cat cookies and cupcakes, there are endless ways to keep things fresh and fun. Changing colors, textures, and display styles can completely transform the look of these treats without changing the theme.
Presentation is one of the easiest ways to elevate cat cupcakes and cookies. Adjusting height, spacing, and grouping helps create a visually appealing setup that feels polished. Even simple treats feel special when displayed thoughtfully.
Mixing cupcakes and cookies together allows you to play with contrast. The softness of cupcakes pairs beautifully with the clean lines of cookies, creating balance and visual interest.

Cat themed treats also adapt well to different party styles. Whether the celebration feels whimsical, modern, or cozy, cupcakes and cookies can be styled to match.
Exploring new ways to display and style cat cookies and cupcakes keeps the theme exciting while maintaining consistency. With a little creativity, these treats can be reimagined for any celebration.
These adorable cat cookies and cupcakes were made to match this adorable cat themed party. Be sure to check it out for fun ways to use these decorations to create a memorable kitten filled party.
SHOP THIS CAT PARTY
This party was honestly so simple to decorate and put together. The Cat Party Tableware set really styled the party. If you feel like Kitty Cat is your theme of choice, I highly recommend this design. The colors are bright and fun and the products are super high quality.
Click the links below to view and purchase the products from Target!

Cat Partyware
The easiest way to serve all the glorious party treats you make and buy is with some themed tableware that complements your cat cupcakes and cookies. Coordinated tableware keeps the entire setup looking polished and intentional.
Themed tableware helps guide the visual flow of the party. Plates, napkins, and serving pieces frame the desserts and support the overall design. This makes even simple treats feel elevated.
Using themed tableware is also budget friendly and practical. Disposable options simplify cleanup while still delivering a cohesive look. This balance is especially helpful for parties with kids.
When tableware matches the theme, the dessert table feels complete without needing extra decorations. The treats remain the star, while the tableware supports the overall presentation.
Choosing themed tableware is a simple but powerful way to keep the design flowing through every part of your party. It reduces stress, enhances visuals, and is definitely a must buy for themed celebrations.
Kitten Tableware from Meri Meri

Cat Tableware from Oriental Trading

Kitten Tableware from Emma’s Arts

Conclusion for Purr-fect Cat Cupcakes + Cat Cookies Tutorial:
If you are looking for some fun and festive kitten cookies or kitten cupcakes for a birthday party or just to say hey…your purr-fect, these adorable cat inspired treats are for you. Simple and easy to make, these delicious treats are playful little kitty designs you will love to bake and eat!
Cat cupcakes and cat cookies are a delightful way to bring personality and charm to a themed celebration. Their playful designs and customizable styles make them a favorite choice for parties that focus on creativity and fun.

When used thoughtfully, these treats become more than just desserts. They contribute to the overall look and feel of the party, helping create a cohesive and visually appealing space. Whether displayed as a centerpiece or mixed throughout the table, they always add charm.
Pairing cat cupcakes and cookies with coordinated tableware enhances the experience even more. Themed plates and serving pieces help frame the desserts and keep the table looking organized and intentional.
The success of a cat themed party often comes down to the details. When decor, food, and presentation work together, the celebration feels polished without being overwhelming.

Cat cupcakes and cookies also make hosting easier. They are simple to serve, easy to portion, and loved by guests of all ages. This makes them both practical and memorable.
In the end, a cat themed celebration is about creating joy. With thoughtfully styled cupcakes, cookies, and coordinated details, the party becomes a warm and playful experience guests will remember long after the last treat is gone.
If you love these cookies and cupcakes, please pin this image to your Birthday Pinterest Board:

Related posts for DIY Cat Cupcakes and Cat Cookies:
- Throw the Purr-fect Cat Themed Party
- How to Plan a Party Animal Party
- Style a Sweet Bear Party
- Trending Party Themes for Girls
- Alice in Wonderland Party
- The Season’s Hottest Flamingo Party Ideas

These are so freaking cute! I love the little kitten cupcakes!
OMG how cute are these?? My nieces love cats. They will absolutely love to have a cat themed party.
Oh, I want these for my next birthday! I’m a total cat person. My boys are too, so we may have to make these just for fun one weekend!
omg these cupcakes are soooo purrrrrrr fect…I am making them for sure, super cute.
These are so adorable. I am a cat lover and so are a few members of my family. I will have to bake these cupcakes for them.
OMG, these are super cute! I have to share this with a friend as she would love to make these!