This post may contain affiliate links. I may earn a small commission if you click and make a purchase, at no extra cost to you.
How to make adorable Llama Sugar Cookies and Llama Cupcakes!
Baking adorable Llama Cookies and Llama cupcakes for a birthday party is easy with these simple to follow instructions. Little llamas are such fun additions to any party. With Llama themed cupcakes and llama sugar cookies, you can keep your treats on theme and still serve delicious goodies.
Ready to learn how to make these fun llama themed desserts?

While you might want to save the drama for your llama…we say llamas can be free of drama when they are this cuddly cute and easy to bake. These furry and fun animals make such a great focus for a birthday party or baby shower.
Honestly it like too of the cutest animals ever (the horse and the rabbit) got together to create an even cuter animal you just want to snuggle, right!
Throwing a LLAMA PARTY?
☑️ This Llama Party Kit is the perfect set to get your party planning headed in the right direction!
With fun fluffy cupcakes and cute royal iced sugar cookies…these llamas are ready to party!
Llama cookies and llama cupcakes are the kind of party treats that instantly set a joyful tone. With their playful faces, cheerful colors, and whimsical personality, they fit perfectly into birthday parties, backyard celebrations, and themed gatherings that lean fun and lighthearted. Llamas naturally bring smiles, which makes them an ideal theme for desserts that are meant to delight kids and adults alike.

One of the biggest reasons llama cookies and cupcakes are so popular is how visually impactful they are. Even a small batch can transform a dessert table into a statement piece. Their recognizable shapes and bright styling help anchor the theme and make the party feel thoughtfully planned from the start.
These treats are also incredibly flexible. Llama cupcakes add height and softness to a display, while llama cookies bring structure and detail. Together, they create balance and visual interest without requiring an overwhelming number of desserts. This makes them perfect for hosts who want a polished look without extra stress.

Another advantage of llama cookies and cupcakes is how approachable they are. They are easy to serve, easy to portion, and easy for guests to enjoy without utensils. That simplicity is especially valuable at children’s parties where movement and activity are constant.
When styled intentionally, llama cookies and cupcakes become more than dessert. They become part of the decor, helping tell the story of the party. Whether displayed front and center or mixed throughout the table, these treats add charm, color, and personality that guests remember long after the celebration ends.
How to use Llama Cookies and Llama Cupcakes
Before we dive into the logistics of making these fun little desserts…let’s talk about throwing a llama themed party.
Llama parties are a snap with fun and colorful llama decor and tableware. I recently styled a simple and fun llama birthday party, where of course I made these amazingly fun treats.
Be sure to check out all the Playful Llama Decorations and Party Ideas!

Llama cookies and llama cupcakes can be used in a variety of ways to enhance both the look and flow of a party. One of the most effective options is to feature them together on a dedicated dessert table. Cupcakes naturally add height, while cookies provide clean lines and detail, creating a visually balanced display.
Cupcakes work especially well as grab-and-go treats. They are easy for kids to pick up and enjoy without making a mess, which keeps the party moving smoothly. Arranging them in neat rows or small clusters helps the display feel organized and intentional.
Llama cookies shine when used as accents throughout the table. They can be stacked, spaced evenly on trays, or placed alongside cupcakes to break up the display visually. Their defined shapes make them feel decorative as well as delicious.
These treats can also be used beyond the dessert table. Setting aside a small group as take-home treats or party favors makes guests feel extra special and extends the celebration past the event itself.
Using llama cookies and cupcakes thoughtfully throughout the party helps reinforce the theme while keeping the setup practical and visually appealing.
Ideas for a Llama party
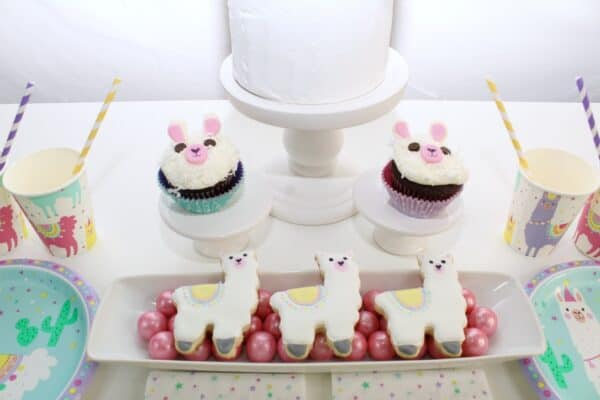
With some colorful cupcake wrappers and some shimmery gum balls to help accent the cookies and cupcakes, these adorable treats fit perfectly into the llama party decorations for this party. The kids definitely loved eating them also.
The llama cupcakes were especially popular with the little girls!
A llama party is all about color, charm, and playful energy. The key to pulling it together is repeating llama details throughout the space so the theme feels cohesive rather than scattered.
Color plays a big role in setting the mood. Bright, cheerful tones feel lively and fun, while softer colors create a more whimsical and cozy atmosphere. Either approach works beautifully for a llama party when the palette stays consistent.
Decor and food should work together to support the theme. Llama cookies and cupcakes naturally become focal points, especially when their colors match the rest of the party setup. This connection helps the entire space feel intentional.
Layering details adds depth without clutter. Mixing textures, heights, and simple accents keeps the party visually interesting while still feeling balanced.
A well planned llama party feels joyful and welcoming. When every detail supports the theme, guests feel immersed in the celebration from the moment they arrive.
Llama Cupcakes Tutorial: STEP by STEP
Alright…let’s get started with these fun and fluffy llama cupcakes. While these cuties are super simple, they have the appearance of being complicated…which honestly is the BEST kind of dessert for a party. You can make a bunch quickly, but they aren’t expensive or crazy time consuming!

Materials:
- Cupcakes (I used this moist chocolate cupcake recipe, but you can bake or buy any flavor of cupcakes for the base)
- White frosting (any flavor)
- Shaved coconut
- Chocolate Chips
- White fondant
- Pink fondant
- Edible marker
- Oval fondant punch

Step 1:
Bake cupcakes according to chosen recipe and allow to cool completely before decorating. Once cupcakes are cool frost with white frosting.
I recommend using a piping bag and large tip for these cupcakes, but because the icing will be smashed, you can just apply a liberal amount with a knife if you choose.
Step 2:
Prep fondant. You will need to cut 5 pieces of fondant per cupcake. From the white fondant, cut 3/4 inch triangles (2 per cupcake) and round the edges with your fingers. Set aside.
From the pink fondant, cut 1/2 inch triangles (2 per cupcake) and round the edges with your fingers. Place the pink inner ear triangles onto the center of the white outer ears. Allow to harden together.
Also from the pink fondant, punch oval nose/mouth circles. Allow to harden. Once the fondant is completely hardened, use the edible marker to draw a heart shaped nose and mouth lines. Set aside.
Step 3:
Pour shaved coconut into a bowl. Carefully dip the frosted cupcakes into the shaved coconut. This will give the fur-like appearance to the frosting.
Step 4:
Add the ears to the top of the cupcake by sticking the pointy side of the triangles into the frosting. Place two upside down chocolate chips into the frosting for eyes and add the pink circle underneath.
Easy peasy and ready to eat!
Pro tips:
You can buy just white fondant and color some to be pink with gel food coloring, but honestly you need such a small amount of pink fondant to make these cupcakes, I would spend the $3 or so on a small package of already pink fondant and save yourself the time.
Also, if you don’t want to bake or are short on time, you can grab store bought cupcakes with plain white icing (or even wipe the icing off and re-ice them) and decorate accordingly.
DIY Llama Cupcakes Recipe

Alright...let's get started with these fun and fluffy llama cupcakes. While these cuties are super simple, they have the appearance of being complicated...which honestly is the BEST kind of dessert for a party. You can make a bunch quickly, but they aren't expensive or crazy time consuming!
Ingredients
- Cupcakes (I used chocolate, but you can bake or buy any flavor of cupcakes for the base)
- White frosting (any flavor)
- Shaved coconut
- Chocolate Chips
- White fondant
- Pink fondant
- Edible marker
- Oval fondant punch
Instructions
Step 1:
Bake cupcakes according to chosen recipe and allow to cool completely before decorating. Once cupcakes are cool frost with white frosting.
I recommend using a piping bag and large tip for these cupcakes, but because the icing will be smashed, you can just apply a liberal amount with a knife if you choose.
Step 2:
Prep fondant. You will need to cut 5 pieces of fondant per cupcake. From the white fondant, cut 3/4 inch triangles (2 per cupcake) and round the edges with your fingers. Set aside.
From the pink fondant, cut 1/2 inch triangles (2 per cupcake) and round the edges with your fingers. Place the pink inner ear triangles onto the center of the white outer ears. Allow to harden together.
Also from the pink fondant, punch oval nose/mouth circles. Allow to harden. Once the fondant is completely hardened, use the edible marker to draw a heart shaped nose and mouth lines. Set aside.
Step 3:
Pour shaved coconut into a bowl. Carefully dip the frosted cupcakes into the shaved coconut. This will give the fur-like appearance to the frosting.
Step 4:
Add the ears to the top of the cupcake by sticking the pointy side of the triangles into the frosting. Place two upside down chocolate chips into the frosting for eyes and add the pink circle underneath.
Easy peasy and ready to eat!
Notes
Pro tips:
You can buy just white fondant and color some to be pink with gel food coloring, but honestly you need such a small amount of pink fondant to make these cupcakes, I would spend the $3 or so on a small package of already pink fondant and save yourself the time.
Also, if you don't want to bake or are short on time, you can grab store bought cupcakes with plain white icing (or even wipe the icing off and re-ice them) and decorate accordingly.
Llama Cookies Tutorial: STEP by STEP
Ready for some adorable llama cookies? These royal iced cookies are on the intermediate side when it comes to skill. They aren’t complicated, but this is probably not the best cookie for your very first attempt at using royal icing.
Let’s bake some beautiful llama sugar cookies!

Materials:
- Llama cookie cutter
- Sugar Cookie Recipe (You can use any recipe, but I recommend my basic sugar cookie recipe.
- Royal icing. You can buy that mix or here is a great royal icing recipe to use!! If you are new to cookie decorating, you also need a piping bag, icing tip 1/2, coupler, and clip. I recommend this piping tip set. It’s reasonably priced and includes everything you need.
- Gel Food Coloring
- Edible marker
- Parchment Paper

Step 1:
Pick your favorite sugar cookie recipe and prep your dough. For best results, I add a little extra flour to my dough right before I start cutting the cookies so they do not stick to the cutting surface. I also liberally flour the surface I am cutting cookies onto.
Once your dough is ready to start cutting, roll it out to about ¼ inch thick. Don’t be afraid of making thick cookies. I feel like my thicker cookies always bake better and decorate easier!
Step 2:
Preheat oven according to the recipe. Line cookie sheets with parchment paper. Cut the dough using a llama shaped cookie cutter. Bake the cookies according to the desired recipe.
Typically I pull the cookies out of the oven a little earlier than what the recipe calls for. You do not want the edges browning. Browning means you have already baked them too long! Cookies should cool completely before you begin decorating.
For best results, bake cookies the day before you decorate them.
Step 3:
Prepare royal icing. You will need mostly white, with a smaller amount each of yellow, pink, teal and gray.
Add small amounts of water to each container and mix until you get the frosting to the desired consistency. You will want the icing to be fill consistency (honey-like) icing.
Fill piping bags with royal icing.
Step 4:
Start with the yellow icing. Make a half circle on the llama back for the saddle blanket. Fill the circle with yellow icing. Trace the yellow circle with pink and then teal icing.
Outline the cookie with white icing (except for the feet). Fill the cookie with white. While the white is still wet, add small pink, yellow and teal dots around the saddle blanket.
Add small pink dots for ears and a pink circle for the mouth. Be careful not to use too much icing for these dots, as it will spread a bit.
Using the gray icing, outline ad fill in the feet.
Step 5:
Allow the icing to fully harden. Once it is dry. Use the black edible marker to make eye dots and draw on the heart shaped nose and mouth lines.
Cookies are done and ready to enjoy!
Pro tip:
I like to put my icing into plastic wrap and twist the ends before I place it into the piping bags. I then pull the twisted end through the tip and cut it off.
This keeps the piping bags from getting messy (extra washing after the fact) and plopping icing onto plastic wrap is so much faster than trying to fill a piping bag.
DIY Llama Cookies Recipe

Ready for some adorable llama cookies? These royal iced cookies are on the intermediate side when it comes to skill. They aren't complicated, but this is probably not the best cookie for your very first attempt at using royal icing.
Let's bake some beautiful llama sugar cookies!
Ingredients
- Llama cookie cutter
- Sugar Cookie Recipe (You can use any recipe, but I recommend my basic sugar cookie recipe.
- Royal icing. You can buy that mix or here is a great royal icing recipe to use!! If you are new to cookie decorating, you also need a piping bag, icing tip 1/2, coupler, and clip. I recommend this piping tip set. It’s reasonably priced and includes everything you need.
- Gel Food Coloring
- Edible marker
- Parchment Paper
Instructions
Step 1:
Pick your favorite sugar cookie recipe and prep your dough. For best results, I add a little extra flour to my dough right before I start cutting the cookies so they do not stick to the cutting surface. I also liberally flour the surface I am cutting cookies onto.
Once your dough is ready to start cutting, roll it out to about ¼ inch thick. Don’t be afraid of making thick cookies. I feel like my thicker cookies always bake better and decorate easier!
Step 2:
Preheat oven according to the recipe. Line cookie sheets with parchment paper. Cut the dough using a llama shaped cookie cutter. Bake the cookies according to the desired recipe.
Typically I pull the cookies out of the oven a little earlier than what the recipe calls for. You do not want the edges browning. Browning means you have already baked them too long! Cookies should cool completely before you begin decorating.
For best results, bake cookies the day before you decorate them.
Step 3:
Prepare royal icing. You will need mostly white, with a smaller amount each of yellow, pink, teal and gray.
Add small amounts of water to each container and mix until you get the frosting to the desired consistency. You will want the icing to be fill consistency (honey-like) icing.
Fill piping bags with royal icing.
Step 4:
Start with the yellow icing. Make a half circle on the llama back for the saddle blanket. Fill the circle with yellow icing. Trace the yellow circle with pink and then teal icing.
Outline the cookie with white icing (except for the feet). Fill the cookie with white. While the white is still wet, add small pink, yellow and teal dots around the saddle blanket.
Add small pink dots for ears and a pink circle for the mouth. Be careful not to use too much icing for these dots, as it will spread a bit.
Using the gray icing, outline ad fill in the feet.
Step 5:
Allow the icing to fully harden. Once it is dry. Use the black edible marker to make eye dots and draw on the heart shaped nose and mouth lines.
Cookies are done and ready to enjoy!
Notes
Pro tip:
I like to put my icing into plastic wrap and twist the ends before I place it into the piping bags. I then pull the twisted end through the tip and cut it off.
This keeps the piping bags from getting messy (extra washing after the fact) and plopping icing onto plastic wrap is so much faster than trying to fill a piping bag.
Coordinating Llama Party Supplies
If you want to style a party around these fun llama themed treats…you should definitely check out these amazing llama party decorations and tableware:
SHOP THIS LLAMA PARTY
Are you looking to score these adorable llama party decorations?
It’s such a great, super trendy party theme for little girls.
Click the links below to view and purchase the products from Birthday in a Box!

Llama Partyware
The easiest way to serve all the glorious party treats you make and buy is with some themed tableware that coordinates with your llama cookies and cupcakes. Themed tableware instantly pulls the entire dessert table together and makes the setup feel polished.
Using coordinated tableware helps maintain visual flow across the party space. Plates, napkins, and serving pieces frame the treats and support the overall design, making even simple desserts feel party-ready.
Themed tableware is also a budget friendly and practical choice. Disposable options make cleanup quick and stress free, which is especially helpful when hosting kids. This allows you to focus on enjoying the celebration instead of managing details.
When tableware matches the theme, the dessert table feels complete without needing extra decorations. The treats remain the highlight, while the tableware quietly supports the look.
Choosing themed tableware is one of the easiest ways to keep the design flowing through every part of your party. It simplifies planning, enhances presentation, and is definitely a must buy for themed celebrations.
Llama Plates from Oh So Fancy

Llama Partyware from Party Decor

Llama Tableware from Stesha Party

Llama Tableware from Crafty Party

Conclusion for Llama Sugar Cookie Recipe:
Llama cookies and llama cupcakes are adorable and make great treats for a fun birthday party! With these easy to follow tutorials, you can make delicious llama cookies and cupcakes for your party or even just for fun. If you love furry and fun llamas, give these delicious treats a try!
Llama cookies and llama cupcakes bring warmth, personality, and playful charm to any themed celebration. Their friendly designs and cheerful colors make them an instant favorite, especially for parties that focus on fun and creativity.
When used together, these treats create balance on the dessert table. Cupcakes add softness and height, while cookies provide structure and detail. This combination keeps the display visually interesting without feeling crowded.
Pairing llama cookies and cupcakes with coordinated tableware enhances the overall experience. When everything works together, the party feels cohesive and thoughtfully styled from start to finish.
The success of a llama themed party often comes down to the details. Repeating motifs, maintaining a consistent color palette, and layering elements carefully help create a polished look without unnecessary effort.

Llama cookies and cupcakes are also incredibly practical. They are easy to serve, easy to enjoy, and loved by guests of all ages. This makes them both functional and memorable.
At the heart of it all, a llama themed celebration is about joy. With thoughtfully styled treats and coordinated details, the party becomes more than a gathering. It becomes a warm, playful experience guests will remember long after the last cupcake is gone.
If you love these cookies and cupcakes, please pin this image to your party Pinterest board:

Related posts for DIY Llama desserts:
- Playful Bright Llama Party Ideas
- Trending Party Ideas for Girls
- Delightful Narwhal Birthday Party Ideas
- Throw the Perfect Cat Party
- How to throw a Party Animal Party
- Woodlands Desserts and Treats
- DIY Flamingo Party Ideas
- Girly Boho Chic Party

Llamas are one of my weaknesses! These llama cookies are perfect for birthday parties and entertaining.
The llamas are so cute! I don’t know when I would have a llama party, but I wasn’t expecting my youngest to come up with a banana party either! The coconut is perfect for making the llama cupcakes look fuzzy.
How cute are these llama cookies I am definitely saving this for later!
These cookies and cupcakes are super cute! I am inspired to have a llama party now!
ahhhh these cookies look sooo cute and so delicious! I would love to make them with my kids, that would be so much fun.
Oh my word how cute are these?? I love baking cupcakes but not really good at decorating. So excited to give this a shot and see how my llamas turn out.
Absolutely gorgeous! Love baking so plan on trying this. Great tutorial you have here.
These Llama cookies so cute perfect serving for children’s party I would love to check this at home.