This post may contain affiliate links. I may earn a small commission if you click and make a purchase, at no extra cost to you.
How to make a Rainbow Cake + other Desserts
Celebrating a birthday with a colorful rainbow party? Try baking some delicious and adorable rainbow desserts. From sweet sugar cookies to a colorful rainbow cake, these colorful party treats are perfect for a bright and bold birthday party. Check out all the sugary goodness…

Baking with color has to be the best. Yes…it’s fun to make cute character cookies or to design a fun muted pink floral cake, but using bright and playful colors just makes the heart happy. For this colorful tween spa party, I made cute rainbow sugar cookies, strawberry cupcakes with colorful fondant toppers and a colorful rainbow layer cake.
There is something so magical, joyful, and instantly uplifting about rainbow desserts. Whether you’re planning a rainbow birthday party, a St. Patrick’s Day celebration, a classroom event, a baby shower, or simply want a fun, colorful treat for your kids, rainbow desserts make EVERY celebration happier. They’re bright, whimsical, and visually stunning—and best of all, they’re often much easier to create than they look. Rainbow cookies, cupcakes, and cakes naturally become the centerpiece of any dessert table because their colors draw people in with that irresistible “WOW!” moment.
What I love most about DIY rainbow desserts is that you can customize them to fit your personal style or party theme. You can go classic ROYGBIV bold… soft pastel… neon bright… unicorn-themed… or even boho rainbow with muted earth tones. Rainbow desserts can be completely homemade, semi-homemade, or store-bought with DIY decorating hacks—whatever works for your time, budget, and comfort level in the kitchen.

Kids especially LOVE rainbow desserts because they feel fun and magical. Whether it’s a rainbow-swirled cupcake, a rainbow sprinkle cookie, or a colorful layered cake, these treats automatically feel special. Even adults get that nostalgic “childhood magic” feeling when they slice into a rainbow layer cake or grab a bright cookie off the tray. The colors make everything feel more celebratory and joyful.
Rainbow desserts are also incredibly photogenic. They instantly brighten up a dessert table and make your party photos pop. With very little effort, a rainbow treat transforms your setup into something polished, intentional, and absolutely adorable. Pair them with rainbow balloons, colorful serveware, and themed party ware, and your entire party looks like a Pinterest dream.

Whether you’re planning a big rainbow-themed bash or adding small pops of color to another theme, these DIY rainbow dessert ideas will help you create treats that are both stunning and surprisingly simple. Let’s chat about fun ways to use rainbow cookies, cakes, and cupcakes… how to style them… and how to build the most cheerful rainbow dessert spread ever!
How to use Rainbow Cookies, Cakes and Cupcakes
Rainbow cookies, cakes, and cupcakes are incredibly versatile—they can be used in so many cute and creative ways throughout your celebration. For starters, they make a stunning centerpiece for your dessert table. Rainbow treats naturally draw the eye, so placing them front and center instantly gives your setup a WOW factor. You can display them on tiered stands, pastel platters, clear trays, or colorful cake boards to highlight their bright layers and swirls.
They’re also perfect for party favors. Just wrap individual cookies or cupcakes in clear treat bags, tie with ribbon, and add a themed tag. You can also use them as place-setting treats at kids’ tables or combine several rainbow desserts on a dessert sampler tray for guests to nibble on throughout the party. Rainbow treats are also great additions to lunchboxes, classroom parties, potlucks, or even “just because” baking days at home. No matter how you use them, rainbow desserts bring instant happiness and charm to your celebration.
Using rainbow desserts in a party is super easy. Because the treats themselves are colorful, they work really well displayed on white plates and platters.
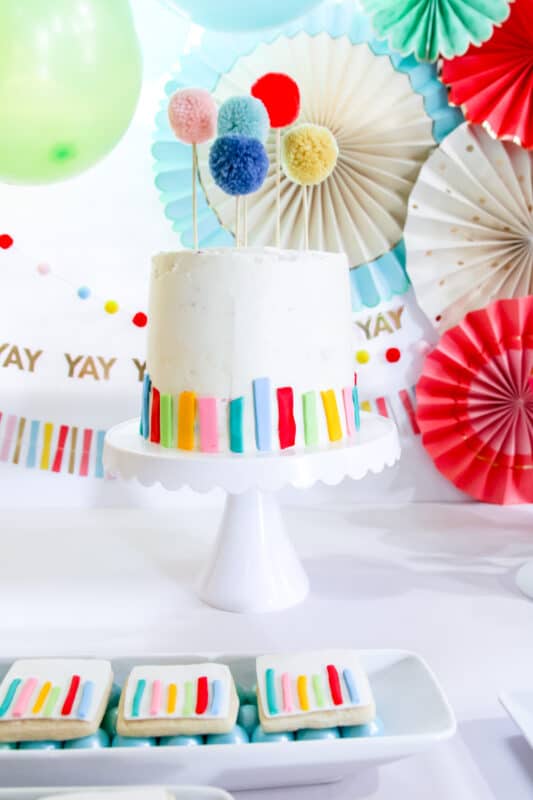
This simple white cake stand is perfect for this colorful, yet understated cake.
Ideas for a Rainbow party
These rainbow desserts were made for my tween daughter’s recent spa party. We wanted a bright colorful design with a rainbow feel without being strictly rainbow. The design used less common versions of the colors and simple designs.
A rainbow party is one of the happiest themes you can plan. It’s bright, flexible, playful, and perfect for all ages. Whether you choose classic rainbow colors or go trendy with pastels or boho tones, rainbow parties feel magical from the moment guests arrive. Think balloon arches bursting with color, rainbow fringe curtains, cloud elements, gold accents, and fun rainbow crafts that keep kids entertained.
You can build stations like rainbow necklace making, rainbow painting, coloring pages, sensory bins, or mini slime cups in every color. Pair your activities with rainbow food—fruit trays, popcorn mixes, Jell-O cups, colorful cookies, and DIY cupcakes. The key to a rainbow party is letting COLOR take the lead. It’s easy to decorate, easy to style, and always looks adorable in photos. Rainbow parties truly bring joy in every direction.
RELATED: How to Plan a Colorful Spa Day Party
Rainbow Cookies Tutorial: STEP by STEP
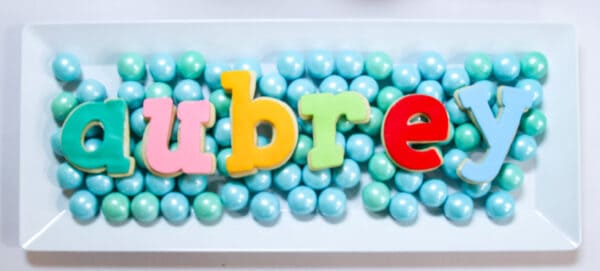
Alright…let’s talk cookies. For the rainbow cookies, I used two different designs. With the first, they cookies were letter cut outs. I used the letter cookies to spell out my daughter’s name on the dessert table.
I then also as favors “tags” for the favor bags. Each girl had a different colored bag of goodies and I matched the cookie color to the bag to help identify who each bag belonged to.
The second design matched the printables I made for the party. I was a series of stripes (kind of like they were made with a paint brush) on a bright white background. Simple and with enough pop of color that it worked perfectly.

Let’s break down how to make these cookies.
Materials:
- Square Cookie Cutters
- Letter Cookie Cutters
- White Fondant (or Red Fondant, Pink Fondant, Teal Fondant, Yellow Fondant, Light Green Fondant and Light Blue Fondant)
- Gel Food Coloring (if using White Fondant)
- Sugar Cookie Recipe: I used my no-fail, easy to use Sugar Cookie Recipe.
- White frosting
Step 1:
First, cut and bake the cookies.
For the sugar cookies themselves, you can use any recipe. I highly recommend my basic cut out sugar recipe. It is really great for keeping shape and it tastes delicious.
Prep the dough according to the recipe.
You will want to use a liberal amount of flour on the surface you are cutting and even a little extra in the dough itself.
Roll out dough until it about ¼ inch thick. Allow the cookie to be a little on the thicker side for even better flavor and shape.
For letter cookies, cut using the letter cutter of your choice. For the rainbow cookies, cut using the small to medium square cookie cutter.
Allow cookies to completely cool prior to decorating. I like to bake the cookies the day before so they are nice a cool for decorating.
Step 2:
Next, you will want to prep your fondant. If you are using white fondant, you will want to color the fondant with the gel food coloring.
If you are using pre-colored fondant, you don’t need to mix any food coloring. Either method works. The only difference is the white fondant option is a little more time consuming, but also more budget friendly.
To color fondant, start with white and add drops of gel food coloring, mixing as you go until fondant is the desired color. Keep mixing until it no longer has a “tie-dyed” look to it. You will need small amounts of red, pink, teal, light blue, green and yellow fondant for this rainbow design.
You will also need larger amounts of the colors you use for the letters.
Step 3:
For the letter cookies: Using your chosen color, roll it out to 1/8 inch thick. Cut the fondant using the same cutter for the letter you baked with. Set aside to begin the drying process. You made need to flip the fondant upside down after an hour or two to allow both sides to evenly dry.
For the rainbow stripe cookies: Roll out white fondant to 1/8 inch thick. Using the same size square cutter you cut the cookie with, cut out a white square. Set aside to dry.
With each color, you will need one “stripe” per cookie. Roll the color out to 1/8 inch thick. Using a knife, cut the fondant into thin strips (approximately 1/8 inch). Cut the strips into pieces ranging from 1/2 inch to an inch long. Set aside to dry.
You want the pieces to be slightly varying lengths to give the cookies the less uniform look.
Step 4:
Once all the pieces are dry, you will gently place the stripes onto the white fondant. I put a very, very small bit of white frosting on the back of each stripe to help it adhere to the white fondant. If the backs of the stripes are still slightly tacky, you can skip the frosting, but it does help keep the pieces secure.
Put a very thin layer of frosting on the cookies and add the fondant toppers. Easy peasy and done!

Rainbow Cake Tutorial: STEP by STEP
And now onto the simple Rainbow cake. This cake was fun to make and delicious! This tutorial will focus on the outside of the cake. For detailed instructions on how to make the rainbow layer cake interior, checkout this layer cake recipe and tutorial first. Then come back for the decorations here!

Materials:
- Cake (instructions here)
- White frosting (homemade or store bought)
- White Fondant (or Red Fondant, Pink Fondant, Teal Fondant, Yellow Fondant, Light Green Fondant and Light Blue Fondant)
- Gel Food Coloring (if using White Fondant)
- Cake Decorating Tools (optional)
Step 1:
Bake your cake according to recipe. Once the layers are assembled and it’s ready to be frosted, we are ready to start decorating.
Step 2:
For details on prepping fondant, see the cookie instructions above.
Roll out colored fondant to 1/8 thick.
With each color, you will need several “stripes”. Using a knife, cut the fondant into strips (approximately 1/2 inch). Cut the strips into pieces ranging from 1 inch to 2 inch long. Set aside to dry.
You want the pieces to be slightly varying lengths to give the cookies the less uniform look.
Step 3:
For this cake I used a rough ice method. You can also smooth ice it for the same effect. Rough ice is just a little more forgiving. Using a frosting spatula, smooth white frosting over the cake until completely covered and at the desired level of thickness and smoothness.
Gently place rainbow stripes into the frosting along the bottom of the cake.
Add a fun cake topper like this one for an extra special look.
Here is the interior of this fun layer cake…

Rainbow Cupcakes Tutorial: STEP by STEP
Let’s look at how to make these simple fondant cupcake toppers. For these cupcakes, I made my super delicious strawberry cupcakes.

Materials:
- Circle Cookie Cutters
- White Fondant (or Red Fondant, Pink Fondant, Teal Fondant, Yellow Fondant, Light Green Fondant and Light Blue Fondant)
- Gel Food Coloring (if using White Fondant)
- White frosting
Step 1:
For details on prepping fondant, see the cookie instructions above.
Roll out white fondant to 1/8 inch thick. Using a 2 inch circle cutter, cut out a white circle. Set aside to dry.
With each color, you will need one “stripe” per topper. Roll the color out to 1/8 inch thick. Using a knife, cut the fondant into thin strips (approximately 1/8 inch). Cut the strips into pieces ranging from 1/3 inch to a 1/2 long. Set aside to dry.
You want the pieces to be slightly varying lengths to give the cookies the less uniform look.
Step 2:
Once all the pieces are dry, you will gently place the stripes onto the white fondant. I put a very, very small bit of white frosting on the back of each stripe to help it adhere to the white fondant. If the backs of the stripes are still slightly tacky, you can skip the frosting, but it does help keep the pieces secure.
Easy peasy and ready to add to the top of your beautifully frosted cupcakes!

Looking for more ideas for Rainbow Desserts?
Are you looking for more ideas for rainbow themed desserts and treats? Check out these Rainbow Desserts for more inspiration!
If you’re craving even MORE colorful inspiration, rainbow desserts offer endless possibilities. From rainbow swirl cheesecakes to sprinkle explosion cakes, from dipped pretzels to layered fudge, you can build a dessert table full of texture, color, and excitement. Try rainbow meringues, ombré cakes, pastel frosting blends, colorful Rice Krispie treats, or DIY candy kabobs.
You can also create mini versions of rainbow desserts—rainbow mini donuts, pastel macarons, fruit kebabs, and layered pudding cups. These bite-sized treats are perfect for little hands and make your table look full and festive. For a healthier twist, add a vibrant rainbow fruit bar or veggie platter. When you mix different textures and colors, your dessert table feels dynamic, whimsical, and full of magic. Rainbow desserts are easy to personalize based on your skill level and your party vibe, making them a perfect fit for ANY celebration.
RELATED: Mini Sugar Cookie Fruit Pizza Recipe
Coordinating Rainbow Party Supplies
When you’re serving bright, colorful rainbow desserts, one of the easiest ways to make your entire setup feel cohesive and polished is by using themed party ware. This is one of my favorite hosting hacks because it packs SO much visual impact without requiring complicated decorations or a ton of prep. Simply placing your rainbow cookies, cupcakes, and cake on matching plates, adorable napkins, or colorful trays instantly elevates your entire dessert table.
Themed party ware also helps keep your design consistent throughout different parts of your celebration. When your dessert table matches your snack area, drinks station, and kids’ table, everything feels connected and intentional. This works especially well with rainbow parties because COLOR does so much of the heavy lifting. Bright plates, fun patterned cups, rainbow napkins, or pastel forks all reinforce the theme and make the celebration feel magical for guests.
Kids absolutely notice these colorful little touches. Themed tableware makes everything feel more fun, more festive, and more special. They get excited just looking at the table—before they even taste the treats! And the best part? This strategy is budget-friendly. Instead of investing in tons of expensive décor, your themed party ware becomes both functional AND decorative. It’s a must-buy for rainbow-themed events because it keeps your party looking coordinated, stylish, and totally photo-ready.
Serving up fun Rainbow treats is made so much easier with some adorable coordinating tableware! These treats were even made to match these fun options!
Happy Day Partyware from Oriental Trading

Rainbow Party Supplies from Pretty Party Box

Rainbow Party Supplies from Inspired by Alma

Rainbow Party Supplies from Luck and Luck

Pastel Rainbow Supplies from Little Big Party Co.

Rainbow Tableware from Meri Meri

Hip Hip Hooray Plates from My Mind’s Eye

Shop This Party
If you would like to shop the party featured in this post, here are the direct links for purchase:

- Pom Pom Cake Topper
- Striped Napkins
- Rainbow Napkins
- Happy Birthday Banner
- Garland
- Balloon Garland
- Balloon Kit
- Fan Set
- Paper Cups
- Dessert Plates
Hip Hip Hooray Rainbow Printables
For this fun rainbow party, I used these simple and colorful printables. With bright white and a rainbow feel, these are so much fun and perfect for a big kid birthday bash:
Conclusion for Easy DIY Rainbow Cookies + Cake:
If you love rainbows and sugar, these simple and delicious treats are just for you. This post walks you through baking and decorating fun rainbow inspired cookies, cupcakes and a rainbow layer cake! It’s a beautiful day for some rainbow desserts!
Rainbow desserts bring a special kind of joy that few other party treats can match. Their bold color, playful energy, and whimsical charm make them irresistible to kids and adults alike. Whether you’re making simple rainbow cookies or creating an elaborate layered cake, these treats instantly transform your dessert table into a celebration all on their own. They’re fun, bright, and magical—and the best part is that they can be as easy or as detailed as you want.

One of the greatest things about rainbow-themed desserts is how versatile they are. They work for birthdays, St. Patrick’s Day parties, art-themed events, baby showers, pride celebrations, unicorn parties, and everyday get-togethers. You can adjust your color palette to match the vibe—classic bolds, soft pastels, dreamy watercolor blends, or trendy earth-tone rainbows. With just a few drops of food coloring or a sprinkle of colorful toppings, the entire dessert becomes an instant mood booster.
DIY rainbow desserts also give you the flexibility to create something that fits your skill level. Even if you’re not a baker, you can use store-bought bases—cookies, cake layers, cupcake mixes—and transform them into bright, cheerful masterpieces with simple decorating tricks. Rainbow sprinkles, swirled buttercream, candy strips, or colored frosting can give your treats that “wow” moment with minimal effort. This makes rainbow desserts accessible, beginner-friendly, and still incredibly impressive.

Your rainbow dessert table becomes a focal point of the party, tying together décor, activities, and the overall visual theme. Add cute labels, themed party ware, coordinated serveware, and pops of color, and suddenly your celebration feels cohesive and professionally styled. Even better? Rainbow desserts are naturally photogenic. Every slice, swirl, and sprinkle creates the kind of Pinterest-worthy moment you’ll want to share and remember.
These desserts also bring a sense of wonder to your party. Kids get excited when they see desserts bursting with color. They lean in closer, point out their favorite hues, and giggle with delight when they take their first bite. It’s joyful. It’s playful. It’s exactly what a celebration should feel like.
As you plan your rainbow-themed event, remember that you don’t need perfection to make it magical. Lean into the color. Have fun with the toppings. Mix and match ideas. Whether your rainbow dessert table is simple or extravagant, the magic comes from the happiness it brings to your guests. I hope these ideas inspire you to create colorful, delicious, memory-making treats that make your party truly unforgettable.
If you love these desserts, please pin this image to your birthday Pinterest board:

Related posts for Rainbow Desserts and Party Ideas:
- How to Plan a Colorful Spa Day Party
- Mini Sugar Cookie Fruit Pizza Recipe
- 15 Rainbow Cakes, Cupcakes + Desserts
- Bob Ross Party Ideas for Kids
- DIY Simple Paint Palette Cookies
- Under the Big Top Circus Birthday Party
- Plan the Perfect Animal Party
- Donut Birthday Party Ideas
- Fantastic Crafts for St. Patrick’s Day
- Simple + Fun Shamrock Cupcake Recipe
- St. Patrick’s Day Cakes, Cookies & Desserts
- Must See St. Patrick’s Day Parties
- Pretty Mint Shamrock Birthday Party Ideas
- Amazing Rainbow Party Ideas
- Mint Shamrock Centerpiece Tutorial
- St. Patrick’s Day Crayon Backdrop Tutorial
