Taking Good Invitation Photos. It’s not a difficult as is seems. I have had many clients ask me for tips on taking good invitation photos, so I though it might be something worth sharing on the blog. This is part one of a three post mini-series. Check out our FAQ page for more FAQ related posts.

TIP #1 Be aware of the direction of the photo space on the invitation.
Like the sample photo below, there are many different invitation layouts available for our invitation designs. Some are square shaped, some round, some are rectangular,etc. It is very helpful in selecting or taking a good invitation photo, that you pay attention to the space the photo will be placed in.

It is not always necessary to have your photo be the same orientation as the space, as long as you keep in mind that the picture will be cropped to fit in the space. This means that details like the outfit your child is wearing and sometimes even the top of their head may not show in the photo. This is not necessarily bad…I have seen many a cute photo where the cropping is done on the forehead instead of above the head. To this date…this is still one of my favorite pictures of my little peanut…
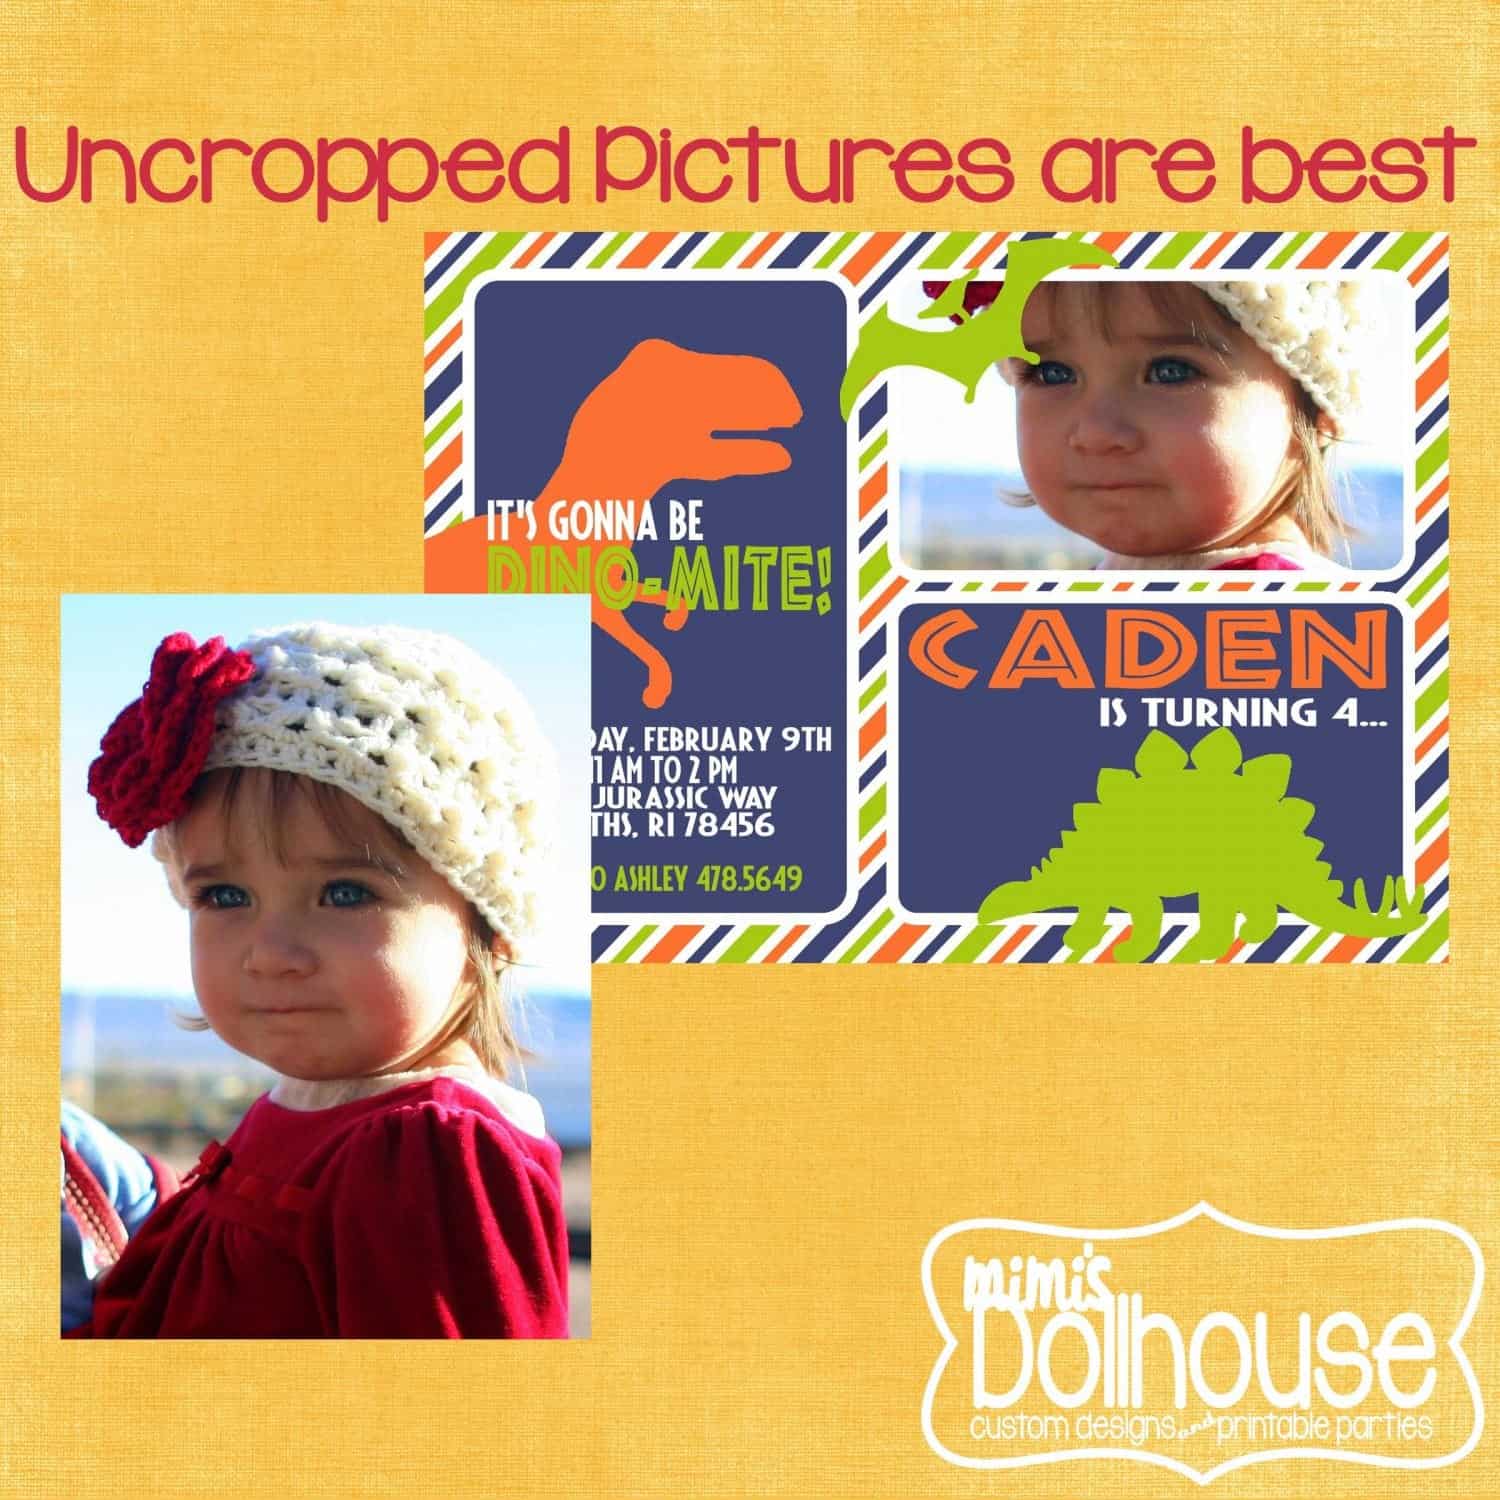
Tip #2 Un-cropped pictures are best when submitting a photo for an invitation
Un-cropped photos are ALWAYS easier to work with when it comes to photo invitations. When you are selecting or taking a good invitation photo, it is important to keep in mind that leaving extra space around your child (especially their head) will make the end result of your invitation much better. With cropped photos, especially those cropped very closely to the child’s face, it eliminates the “wiggle room” with photo placement. Like the photo below, where the photo is cropped close to the face, the top of the head is cropped off and the the placement of the dinosaur is covering part of the face. Because the photo doesn’t allow extra space on the side, there is no way of cropping the photo to fit with the graphic nicely. The top example has lots of extra space around the child, so the picture can easily be resized and positioned within the invitation. This helps your invitation look its absolute BEST!!
Tip #3 High Resolution Photos are best.
I get a lot of questions about resolution for photos. The bottom line, higher resolution is always better. You might be thinking….”what does that mean?” Well, I’m glad you asked! Resolution is basically the number of pixels per inch a photo contains. You can look at it like how much detail is included in the photo without is stretching or blurring the image.

As you can see in the example photo above, the original image is much larger than the photo space being used. This means that the pixel count will not be lowered buy placing the image in the space. If the picture was lower resolution (has fewer pixels) it could blur or look grainy when the photo is enlarged for the picture space. Most mid-range digital cameras will provide photos that are high enough resolution to look great as an invitation photo.
Tip#4 Camera Phone Photos can end up looking blurry or pixelated (grainy).
I’ll admit…I’m always snapping photos with my phone. Some camera phones take gorgeous pictures…some do not. If your phone is outdated or does not have a high quality camera lens…it’s not going to give you the quality you are hoping for. For nice photos or photos you want to frame, or use on an invitation…skip the phone and use a real camera. The difference is HUGE! The above photo was taken with my iPhone. You can see the picture gets grainy and a little blurry when it is blown up to be placed on an invitation. This is also the case with novelty cameras and cameras set to too low a resolution.
Taking good pictures for invitations isn’t as hard as it seems. You can always have your child professionally photographed. There are tons of amazing photographers out there to choose from. My kids LOVE our photographer. She is practically a part of the family now! A Pro Photographer, however, may not be in your budget, schedule, or you just may not be inclined to use one. This does mean that you cannot have a fabulous invitation photo! I have put together a few easy tips for taking good pictures for invitations to help you out.
Tip #5 Skip the hats, sunglasses, pacifiers, and toys.
I see A LOT of photos in this business. I can tell you the ones that make me go “Awwww, how cute” some off those sweet little cheeks and smiles and bright little eyes. Your child may be adorable in a pair of sunglasses or a hat….but it doesn’t always translate well on an invitation. We wanna see those big beautiful smiles. The first photo above, shows off the whole face without anything covering it up. This is ideal. Example #1 below, she is wearing a hat and sunglasses. Now, do I love my daughter all bundled up like this? You betcha. It doesn’t however, look nearly as nice on an invitation as the photo above. My recommendation is to skip the hats, sunglasses, pacifiers, and toys that your child is holding near his face.

Exceptions to the rule….themed hats (for example, you are ordering our train invitation and have a cute little conductor’s hat you want to put your child in. Sure, do it…just be sure that you don’t have the hat too low on the face so it hides hie eyes and be aware of lighting. You don’t want to get shadows cast on his face. If you really love the sunglasses, Example #2 above, shows you how to take the photo to still maximize your child’s face. Notice the nuetral, non cluttered background and the way she is looking straight at the camera. This is still cute and totally works:)
Tip #6 Use a neutral, non cluttered background.
Most often, the invitation design you are selecting will have lots of color and patterns. You don’t need your photo to compete with the design, you want it to compliment the design. Try to stage your photo in front of a solid or neutral background. Great suggestions: white wall, fence outside, sidewalk, hang apiece of fabric behind your child. Example #3 bleow shows a busy background. There are tons of colors and objects that split the focus from your child’s sweet face. Example #4 shows a photo shot fromabove with the sidwalk at the park as the backdrop. This will compliment most if not all invitation designs.

Did you enjoy these tips?


Trackbacks/Pingbacks