Delicious and Cute Strawberry Cookies for a birthday
Looking for a simple and sweet Strawberry Cookie idea? These sugar cookies are adorable and sure to be a hit for your next birthday or springtime party. Check out the easy to follow tutorial below to learn how to make these fun cookies at home!

One of the best parts of prepping for a party is definitely the cookie baking. Today I have two super cute and pretty easy Strawberry cookie tutorials to share today.
One is a fun strawberry shaped sugar cookie. The other is a pretty watercolor sugar cookie. They are both simple and sweet for a Strawberry themed party!
How to use Strawberry Cookies
These strawberry cookies can be displayed in berry baskets for a fun and unique party experience. I filled these with green shredded paper and set the cookies inside. It worked perfectly and was super cute on the the dessert table.

The watercolor strawberry cookies can easily be displayed in plates or with sixlets or gumballs underneath for a little added color. Aren’t they cute?

Ideas for a Strawberry party
If you are looking for more ideas for fun ways you can set up a sweet little strawberry themed birthday party, check out this Berry First Birthday Party for inspiration!

It was fun fun and sweet and a great way to celebrate a first birthday. Be sure to also check out the strawberry smash cake recipe for easy tips to making this cute and super yummy strawberry cake!

Strawberry Cookie Tutorial: STEP by STEP
Alrighty then…let’s bake some cookies!
Making delicious royal iced sugar cookies is a great way to bake a fun and creative treat. These sweet strawberry cookies are perfection.
I have included three different designs in this tutorial to complement your party!
All three designs are made using my basic cut-out sugar cookie recipe and royal icing.

Ingredients
- Gel Food Coloring
- Edible Marker
- Sugar Cookie Dough (here is my recipe)
- Royal icing. You can buy that mix or here is a great royal icing recipe to use!! If you are new to cookie decorating, you also need a piping bag, icing tip 1/2, coupler, and clip. I recommend this piping tip set. It’s reasonably priced and includes everything you need.
- Parchment Paper
- For Strawberry Shaped Cookies: Strawberry Cookie Cutter (I used the Strawberry Cutter from this set for this cake)
- For Watercolor Cookies: Square Cookie Cutter
- For Watercolor Cookies: Paint brush (Paint brush does not need to be fancy, but it should be clean. I recommend using a brush that hasn’t previously been used with paint.)
- For Watercolor Cookies: Paint dish, optional
Step 1:
Pick your favorite sugar cookie recipe and prep the dough. When I’m prepping the dough, I like to add a little extra flour right before I start cutting the cookies so they do not stick to the cutting surface. Also I will liberally flour the surface where I am cutting the cookies.
Once your dough is ready to start cutting, roll it out to about ¼ inch thick. Don’t be afraid of making thick cookies. I feel like the thicker cookies always bake better, decorate easier and taste delicious.
Preheat oven according to the recipe. Line cookie sheets with parchment paper. Cut the dough using a strawberry or square shaped cookie cutter (depending on which design you are baking). Bake the cookies according to the desired recipe.
Allow to cool completely before decorating. I usually like to bake them the day before I decorate.

Strawberry Shaped Cookies
The first design is the strawberry shape cookie. This cute little cookie is super adorable and a favorite of the kids.
Step 2:
Prepare royal icing. You will need pink or red (or a little of both) and green. You can add the gel food coloring to the icing until you have the desired color.
Add small amounts of water to each container and mix until you get the frosting to the desired consistency. You will want the icing to be fill consistency (honey-like) icing.
Fill piping bags with royal icing.
Step 3:
Using the pink/red icing, outline the strawberry fruit section. Fill the pink/red portion of the strawberry and smooth out any air bubbles with a toothpick or fork prong. Allow the pink/red to begin to dry before adding the green.
Using the green, outline one leave section. Fill the leaf section and smooth out air bubbles. Allow to dry/harden before doing the other leaf sections so you have a clear line between them. I will do the two outside leaves and then fill the middle leaf last to save time.
Allow the icing to completely harden.
Step 4:
Using the edible marker, make small “seed” dots on the pink/red portion of the strawberry cookies.
Easy peasy and ready to eat!

Strawberry Watercolor Cookie
Here is how to make the sweet Water color cookies.

Step 1:
Using white icing, outline the cookie. Fill the icing smooth out any air bubbles with a toothpick or fork prong. Allow to completely dry/harden.
Step 2:
Squirt small amounts of green, pink, and red food coloring into paint dish sections. Using the paint brush, get the brush wet and dip it into the food coloring. Paint the strawberry designs onto the fondant just like using watercolor paint.

I recommend starting with the lighter colors and adding darker food coloring to shadow. You can shade the strawberry by coloring more on one side than the other. Add green leaves as desired.
Step 3:
Once the food coloring is dry, use the edible marker to add seed dots to the strawberries.
Allow to dry completely before serving.

Hot to Make Easy + Adorable Strawberry Cookies
Alrighty then...let's bake some cookies!
Making delicious royal iced sugar cookies is a great way to bake a fun and creative treat. These sweet strawberry cookies are
I have included three different designs in this tutorial to complement your party!
All three designs are made using my basic cut-out sugar cookie recipe and royal icing.
Ingredients
- Gel Food Coloring
- Edible Marker
- Sugar Cookie Dough (here is my recipe)
- Royal icing. You can buy that mix or here is a great royal icing recipe to use!! If you are new to cookie decorating, you also need a piping bag, icing tip 1/2, coupler, and clip. I recommend this piping tip set. It’s reasonably priced and includes everything you need.
- Parchment Paper
- For Strawberry Shaped Cookies: Strawberry Cookie Cutter (I used the Strawberry Cutter from this set for this cake)
- For Watercolor Cookies: Square Cookie Cutter
- For Watercolor Cookies: Paint brush (Paint brush does not need to be fancy, but it should be clean. I recommend using a brush that hasn’t previously been used with paint.)
- For Watercolor Cookies: Paint dish, optional
Instructions
Step 1:
Pick your favorite sugar cookie recipe and prep the dough. When I'm prepping the dough, I like to add a little extra flour right before I start cutting the cookies so they do not stick to the cutting surface. Also I will liberally flour the surface where I am cutting the cookies.
Once your dough is ready to start cutting, roll it out to about ¼ inch thick. Don’t be afraid of making thick cookies. I feel like the thicker cookies always bake better, decorate easier and taste delicious.
Preheat oven according to the recipe. Line cookie sheets with parchment paper. Cut the dough using a strawberry or square shaped cookie cutter (depending on which design you are baking). Bake the cookies according to the desired recipe.
Allow to cool completely before decorating. I usually like to bake them the day before I decorate.
Strawberry Shaped Cookies
The first design is the strawberry shape cookie. This cute little cookie is super adorable and a favorite of the kids.
Step 2:
Prepare royal icing. You will need pink or red (or a little of both) and green. You can add the gel food coloring to the icing until you have the desired color.
Add small amounts of water to each container and mix until you get the frosting to the desired consistency. You will want the icing to be fill consistency (honey-like) icing.
Fill piping bags with royal icing.
Step 3:
Using the pink/red icing, outline the strawberry fruit section. Fill the pink/red portion of the strawberry and smooth out any air bubbles with a toothpick or fork prong. Allow the pink/red to begin to dry before adding the green.
Using the green, outline one leave section. Fill the leaf section and smooth out air bubbles. Allow to dry/harden before doing the other leaf sections so you have a clear line between them. I will do the two outside leaves and then fill the middle leaf last to save time.
Allow the icing to completely harden.
Step 4:
Using the edible marker, make small "seed" dots on the pink/red portion of the strawberry cookies.
Easy peasy and ready to eat!
Strawberry Watercolor Cookie
Here is how to make the sweet Water color cookies.
Step 1:
Using white icing, outline the cookie. Fill the icing smooth out any air bubbles with a toothpick or fork prong. Allow to completely dry/harden.
Step 2:
Squirt small amounts of green, pink, and red food coloring into paint dish sections. Using the paint brush, get the brush wet and dip it into the food coloring. Paint the strawberry designs onto the fondant just like using watercolor paint.
I recommend starting with the lighter colors and adding darker food coloring to shadow. You can shade the strawberry by coloring more on one side than the other. Add green leaves as desired.
Step 3:
Once the food coloring is dry, use the edible marker to add seed dots to the strawberries.
Allow to dry completely before serving.
Looking for more ideas for Strawberry Desserts?
Want to make a delicious strawberry cake or cupcakes? Check out this easy and scrumptious cake recipe!

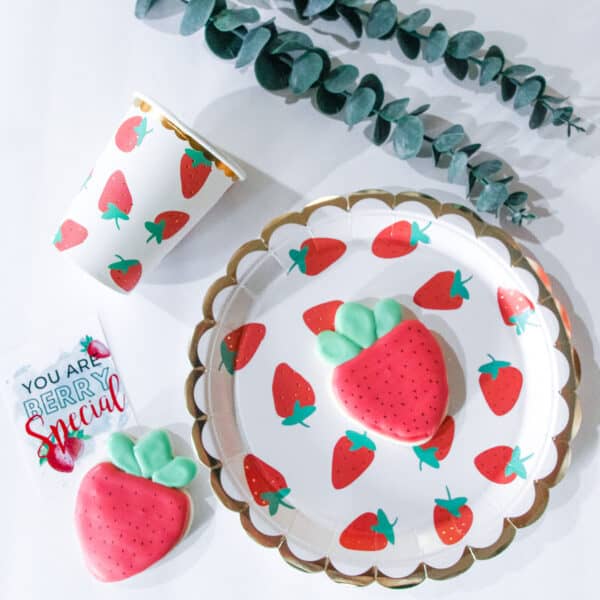
Strawberry Tableware
One of the easiest ways to pull a theme throughout your party is to grab some themed tableware. This cute strawberry set is PERFECT for a Strawberry themed or Berry First Birthday Party!
Strawberry Printables
Wanna throw a Strawberry Party or make a Strawberry Lemonade Stand?
The Instant Download “Berry First Birthday” Strawberry Party Decorations are available for purchase in my shop:
The Printable Strawberry Shortcake Party Decorations are available for purchase in my shop:
Here are some helpful links for planning a Strawberry Party:
Conclusion for DIY Strawberry Cookies:
Are you looking for an easy and delicious Strawberry cookie recipe? You will LOVE these adorable cookies. They are simple and oh so cute. This tutorial is easy to follow for a spring or summer birthday. It’s perfect for a Berry First Birthday!
If you love this cookie recipe, please pin this image to your baking Pinterest board:


Related posts for Easy DIY Strawberry Cookies:
- My Berry First Birthday Strawberry Themed Party
- Super Adorable Strawberry Smash Cake + Cupcakes Recipe
- Sweet + Adorable Ideas for a Lemonade Stand
- Lemonade Stand Playdate
- Gorgeous Watermelon Party Decorations
- Tutti Frutti Party Ideas
- Tutti Frutti Cakes + Dessert Ideas
- Easy DIY Pineapple Sugar Cookies
- Hottest Summer Party Trends
- How to throw the Perfect Pool Party
- Flamingo Party Ideas


